Resource Types & Functionality
📦 Cartons
In order to successfully cartonize with the Paccurate API, users must provide both items to pack and cartons (containers of any type really) to pack those items into. Typically this involves connecting to packaging table within their systems of record before making the API call, but Resources enables users to manage their cartons within the Paccurate platform. Some scenarios that may warrant this approach:
- API is being called from web client that may not have access to WMS data
- WMS carton list not representative of desired cartons
- 3PL - grouping carton collections by customer
- Combining different cartons list on-demand
To create a custom carton resource, log into manage.paccurate.io and navigate to your plan’s Resources page. From the Add dropdown, select “Cartons”
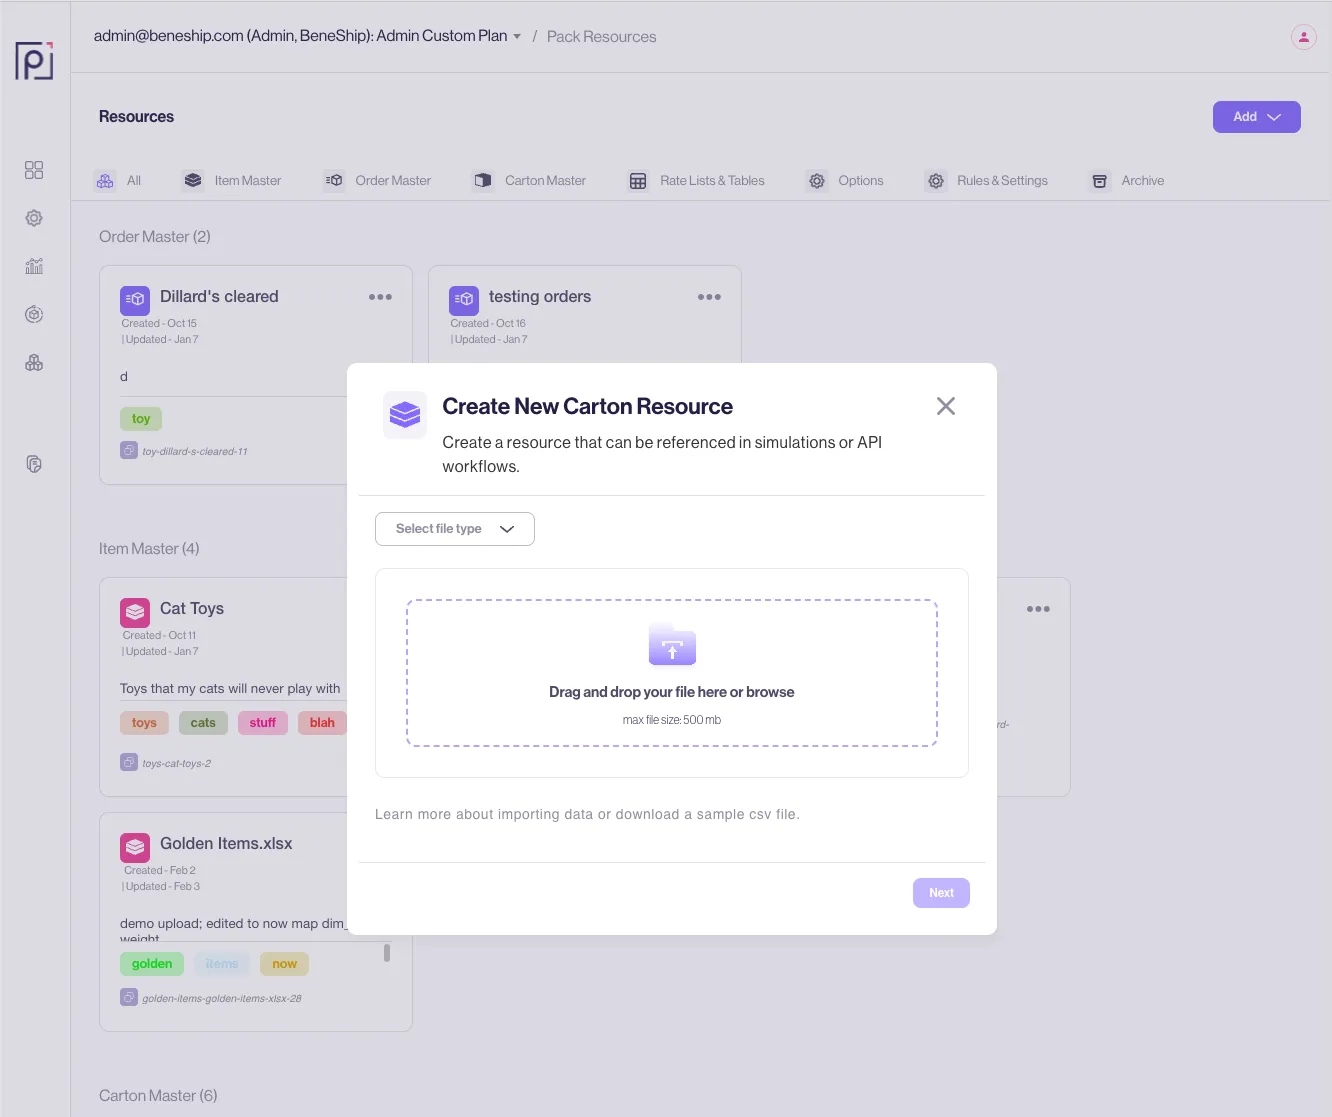
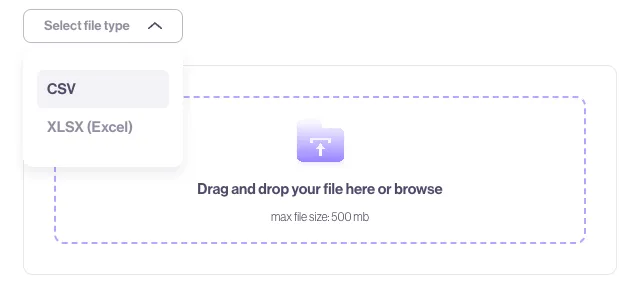
Select the type of file that contains your cartons — we support CSV or XLSX (be sure to label your sheet Cartons in excel)
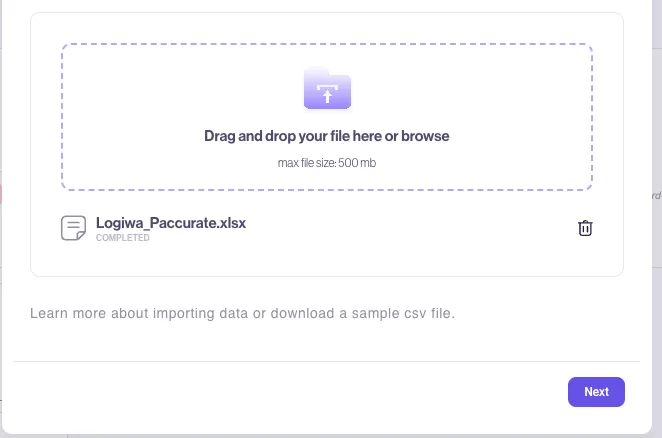
Once uploaded, click “Next” button.
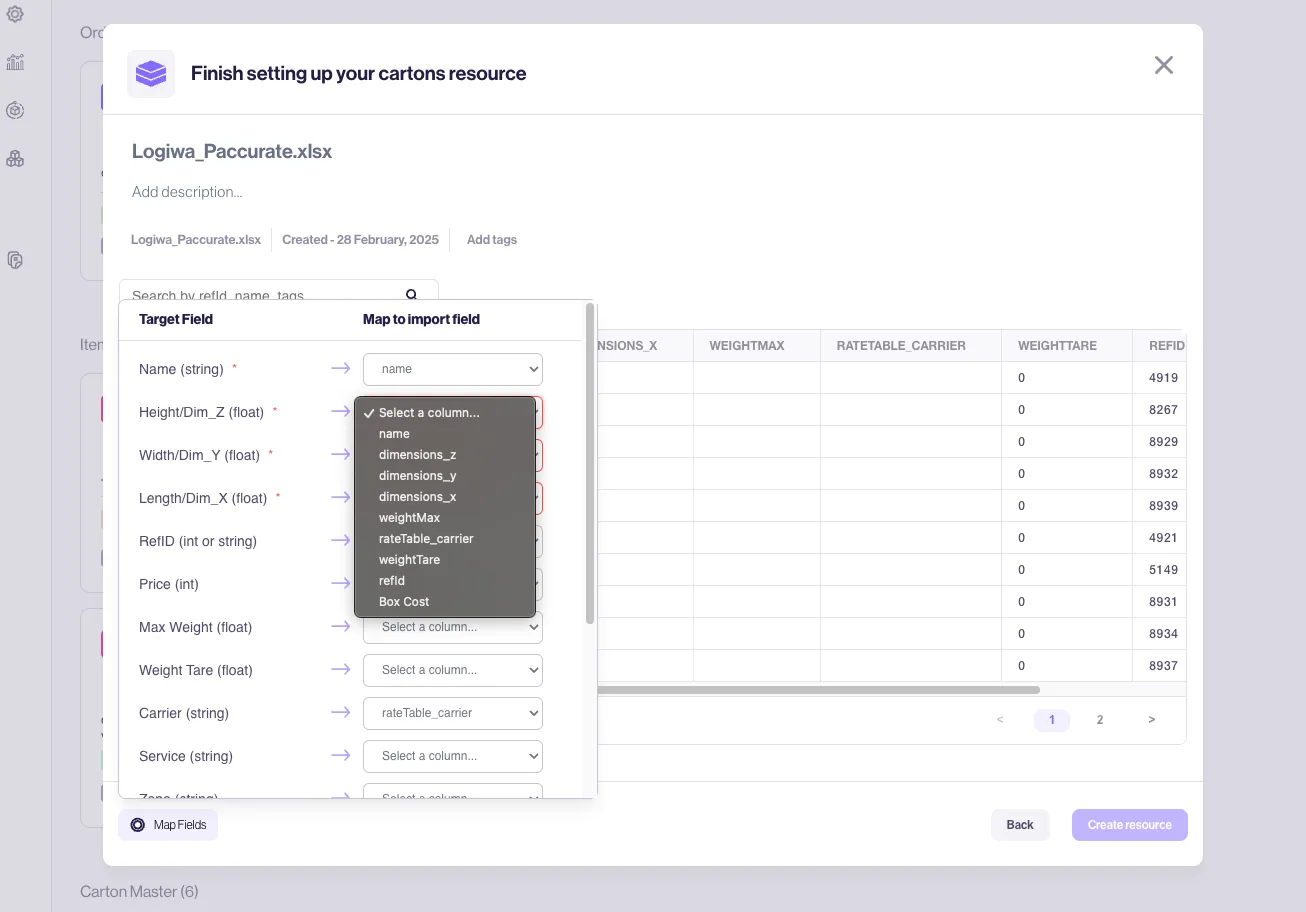
To complete the resource creation, you must complete the field mapping step and add a description and tags. The Map Fields button allows you to assign the correct column from the uploaded spreadsheet to the carton’s required properties.
With these properties mapped, you can search and sort the file and confirm the data looks correct.
Click “Create Resource,” and you are good to go — the resource has been successfully created.
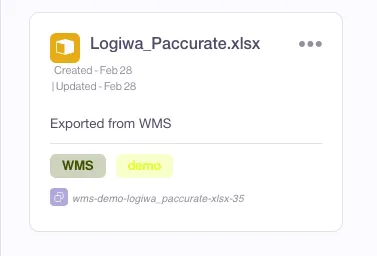
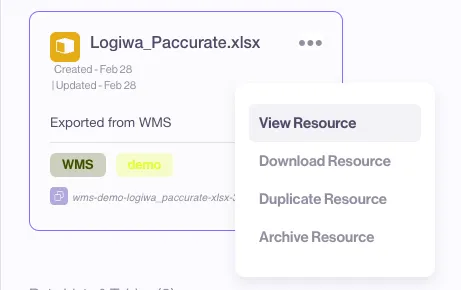
From the card, you can view, download, duplicate, or archive the resource.
✍🏻 Updating a Cartons Resource
To update the data in the resource, click View Resource to open the modal.
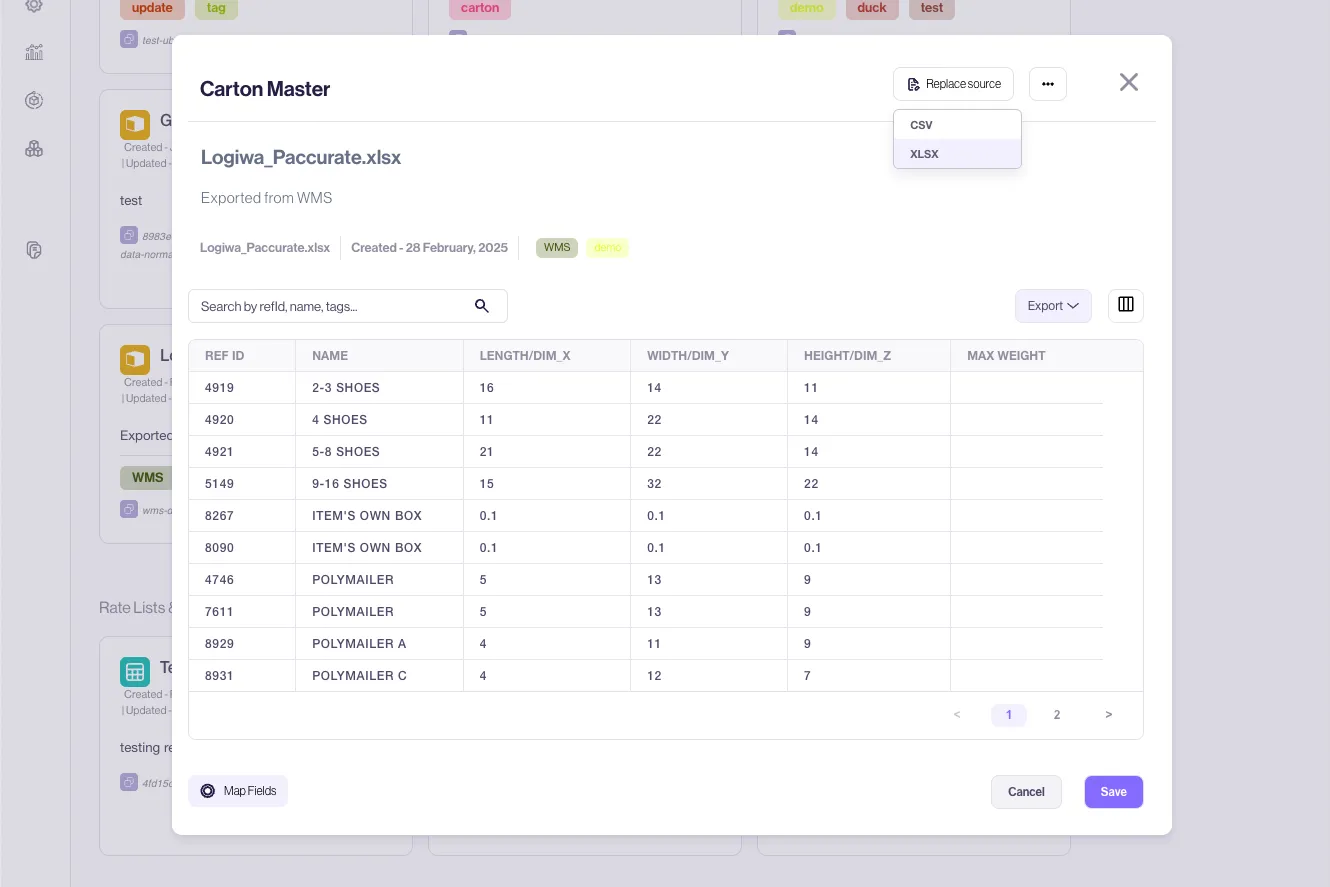
In the top right of the modal, select the type of file you would like to use to replace the data — again, this can be CSV or XLSX. Map the fields on the new file, then click Save. Your resource is now updated.
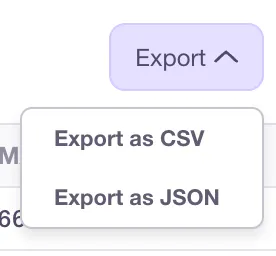
This “View” modal also allows you to export the resource as a JSON list of boxes or a flat CSV file. To the right of the Export dropdown is a button that allows you to show optional data columns in the table.
⚡ Using the Cartons Resource in an API request
Now that you’ve successfully created a Cartons resource, they can be used as part of your API requests. As covered in Anatomy of a Pack request, a successful cartonization request requires the inclusion of boxTypes or boxes for items to pack into. This remains true! but now, we can use a reference to your resource instead of raw JSON code to fulfill the cartons requirement.
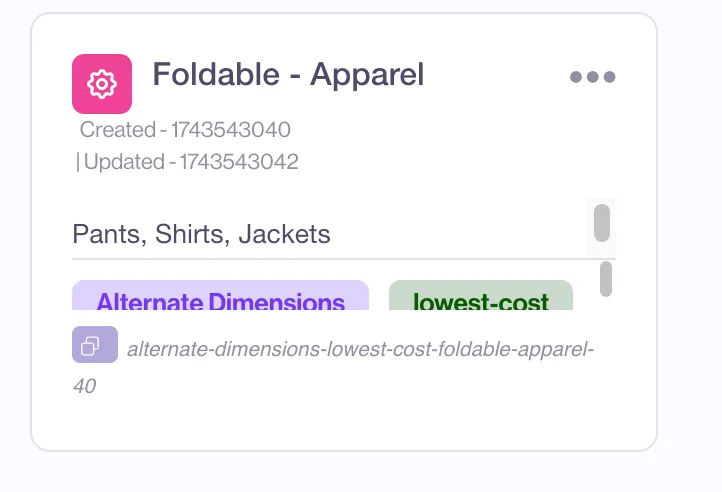
The only thing that the API request needs to know is the slug that is associated with the resource. The resource slug is at the bottom of the resource card — click the purple copy icon to copy the slug to your clipboard; it will have a value such as cartons-master-list-cartons-168 — a name associated with the file you uploaded, with an ID at the end.
The slug is then added to the API request as part of the Resources array attribute.
{
	"itemSets":[...],
	"packResources":[
		"cartons-master-list-cartons-168"
	]
}
The Resources list can contain any resource type that you are trying to include alongside the items that need to be cartonized — that can be multiple carton resources (they will join together), rate information, or advanced packing rules that need to apply to the implementation.
If you include a boxTypes list in your request along with the resources, the boxTypes in the initial payload will override any cartons coming from your resource.
If we include the full item data in the example above, we get a request that looks like
{
    "itemSets": [
        {
            "refId": 0,
            "weight": 1,
            "dimensions": {
                "x": 3,
                "y": 14,
                "z": 18
            },
            "quantity": 6,
            "name": "nylon",
            "sequence": "SHIRT"
        }
    ],
    "packResources":["cartons-master-list-cartons-168"]
}
Sending that to our API, we get a pack that looks like this:
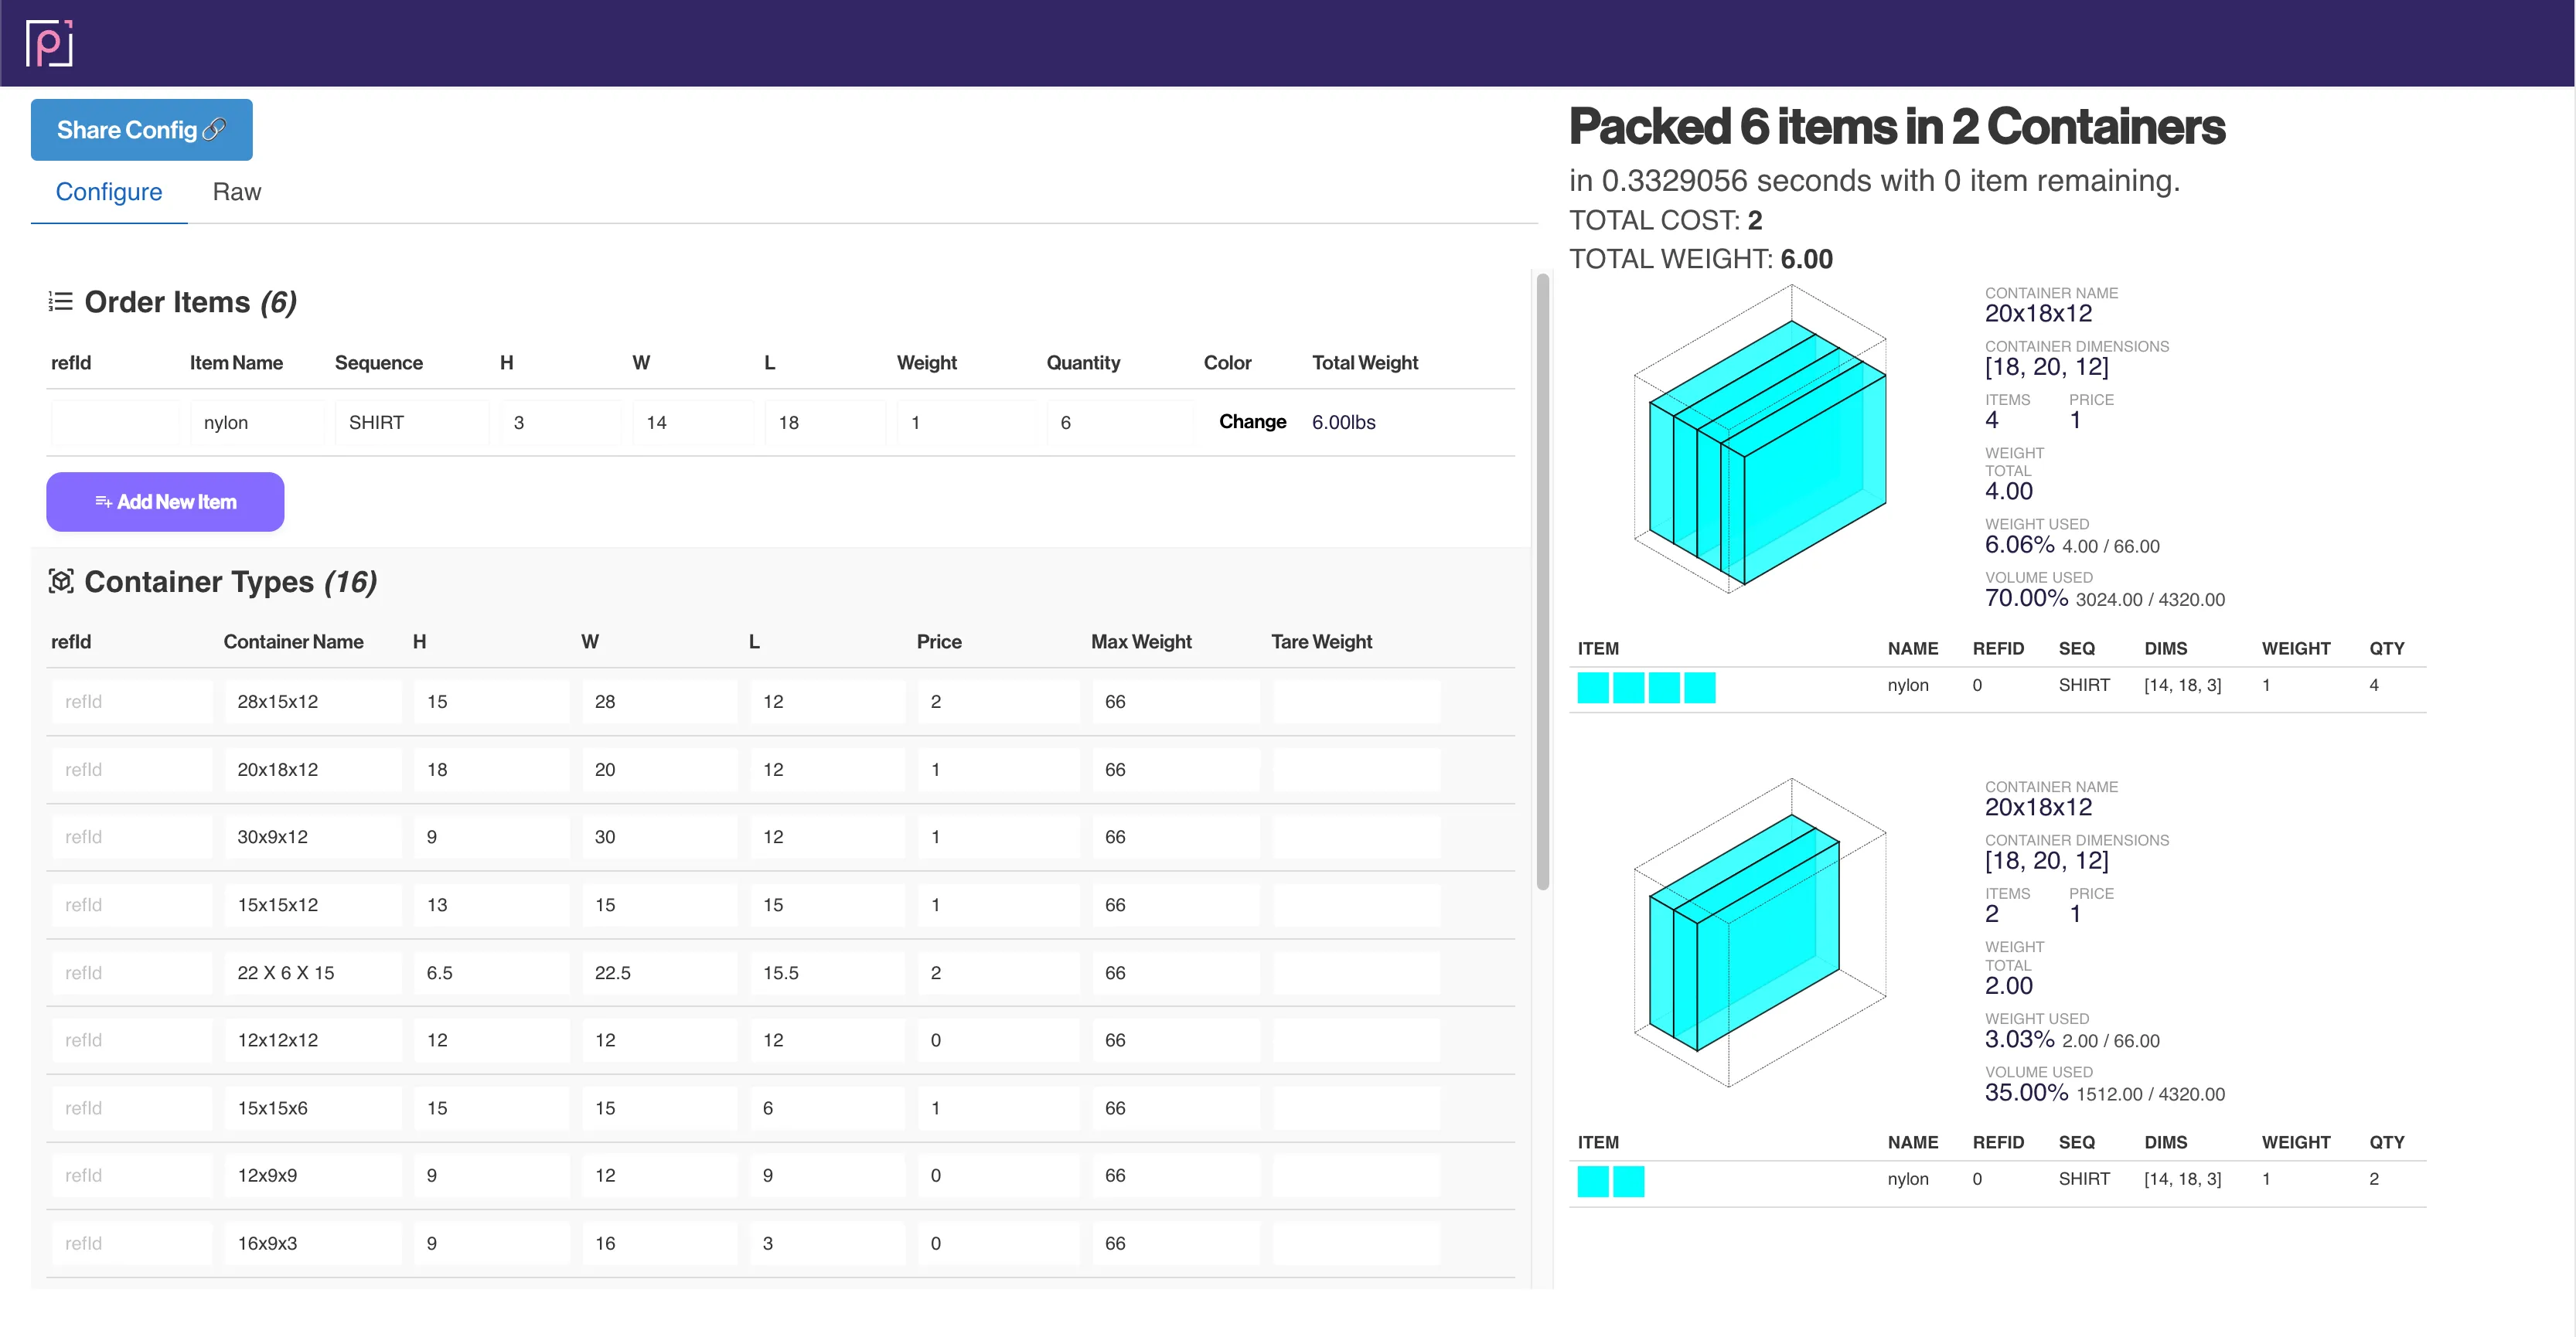
Screenshot of the response from PacAPI, visualized in Inspector
While our order items look like what we sent in our payload, we can see that it chose one of 16 containers which were saved in our resource.
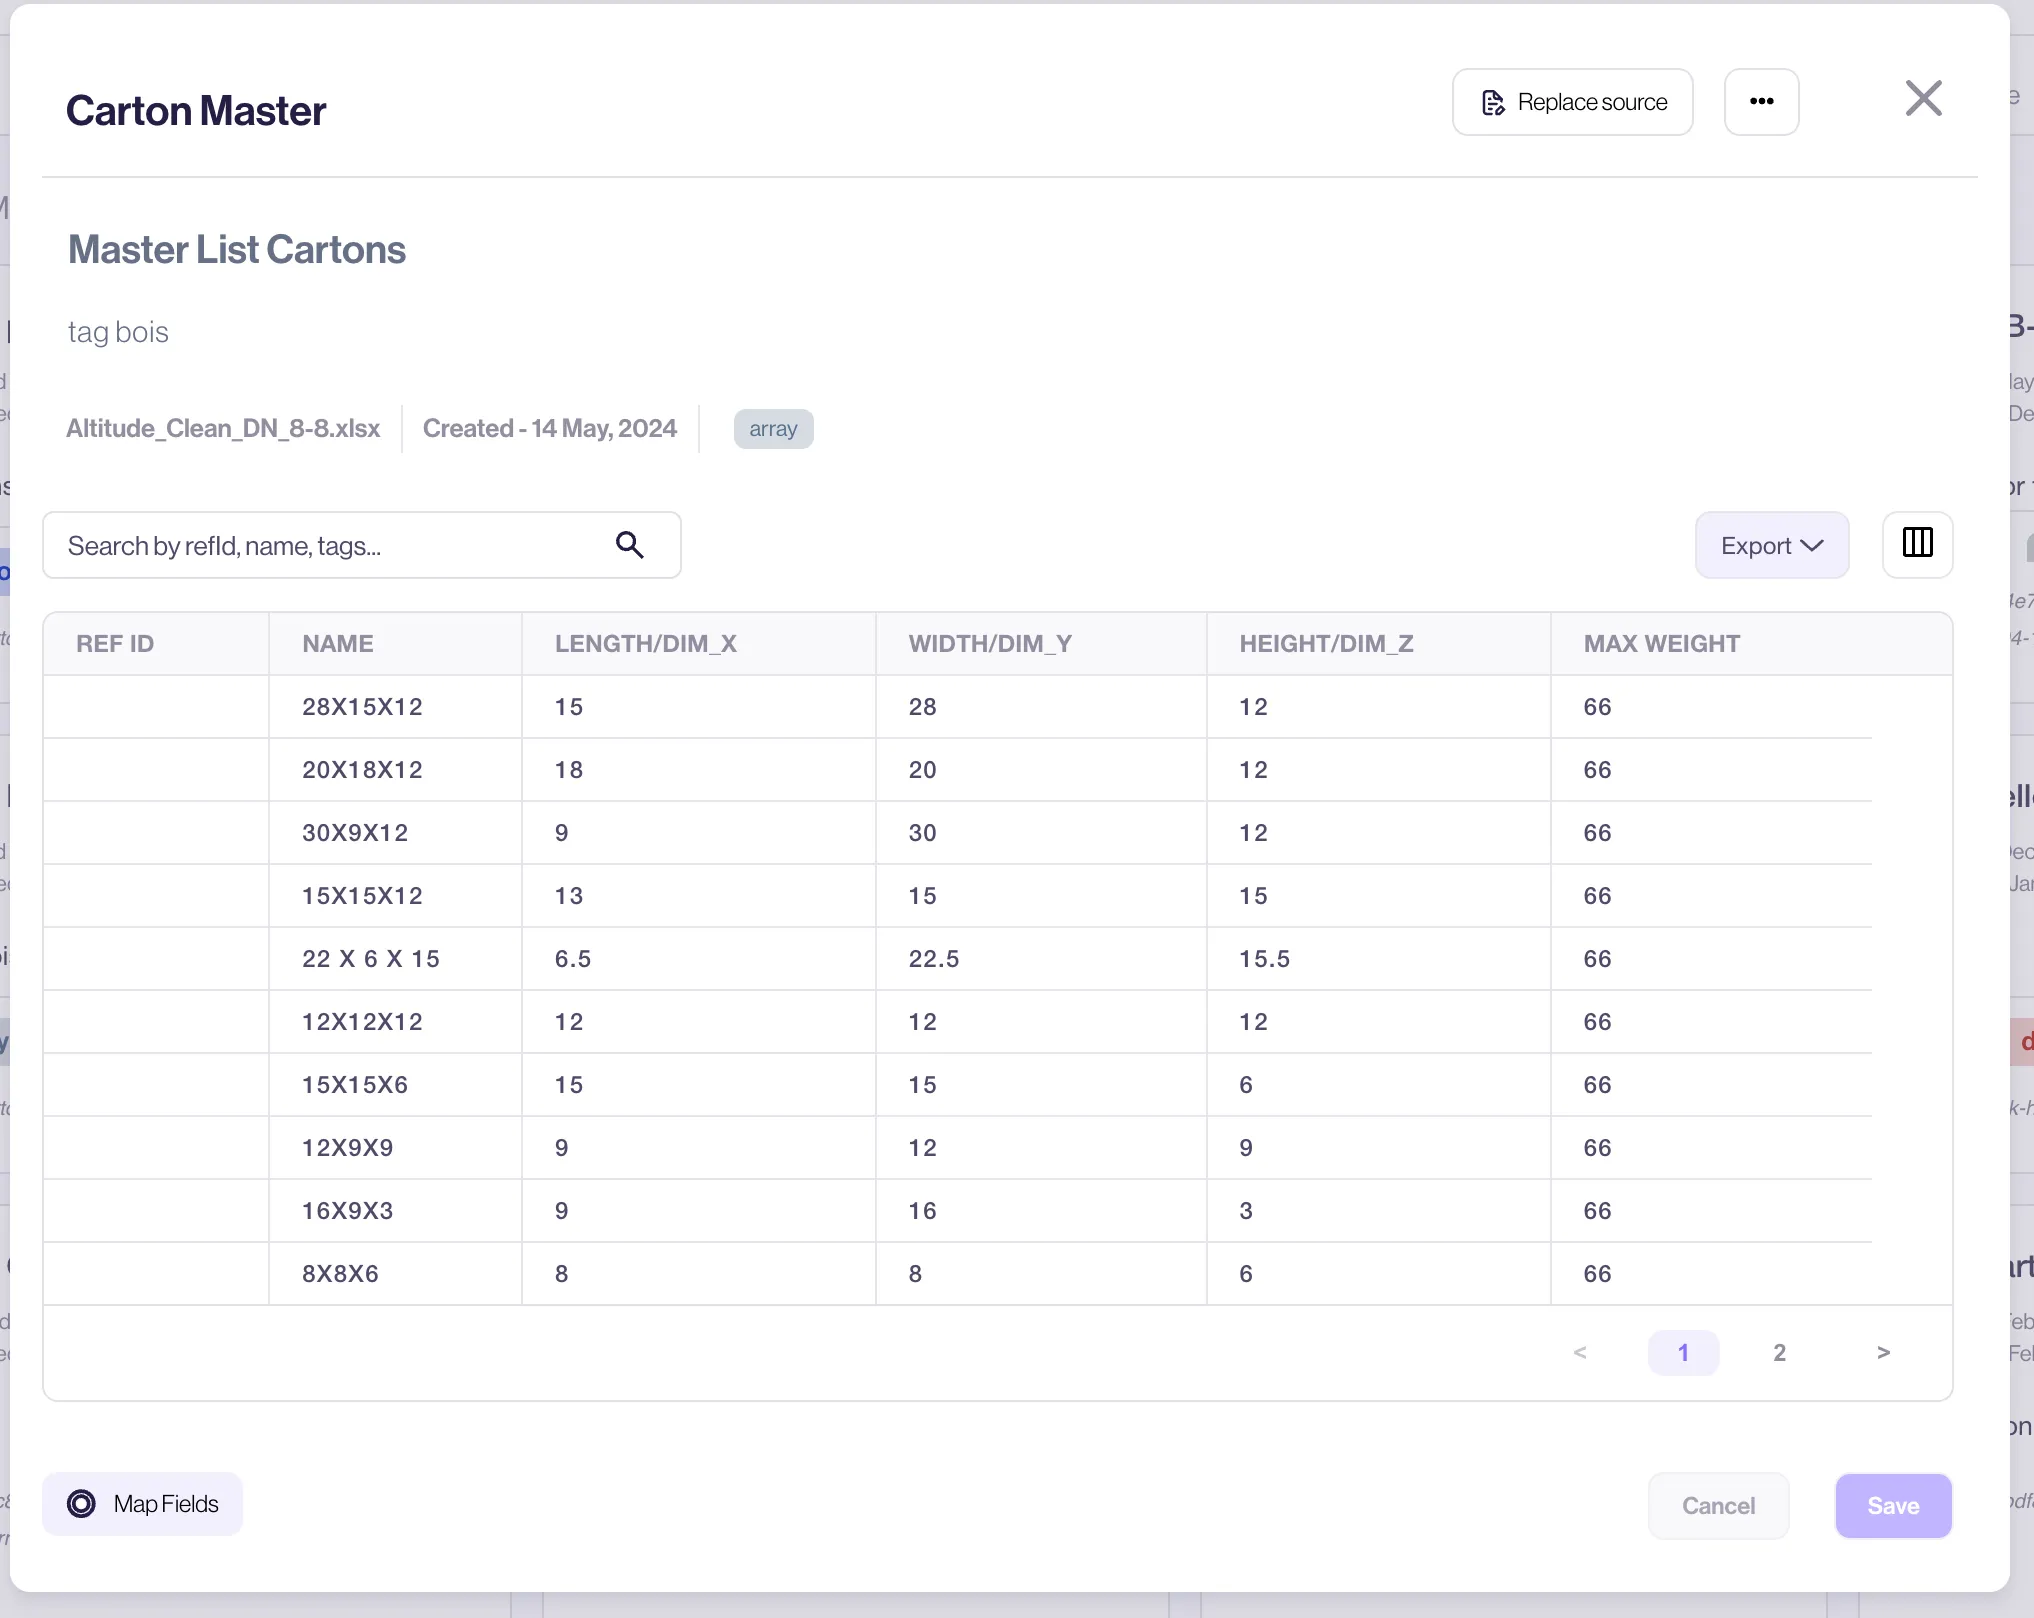
Cartons resource referenced in the request — note the 20x18x12 carton that wound up being selected to cartonize.
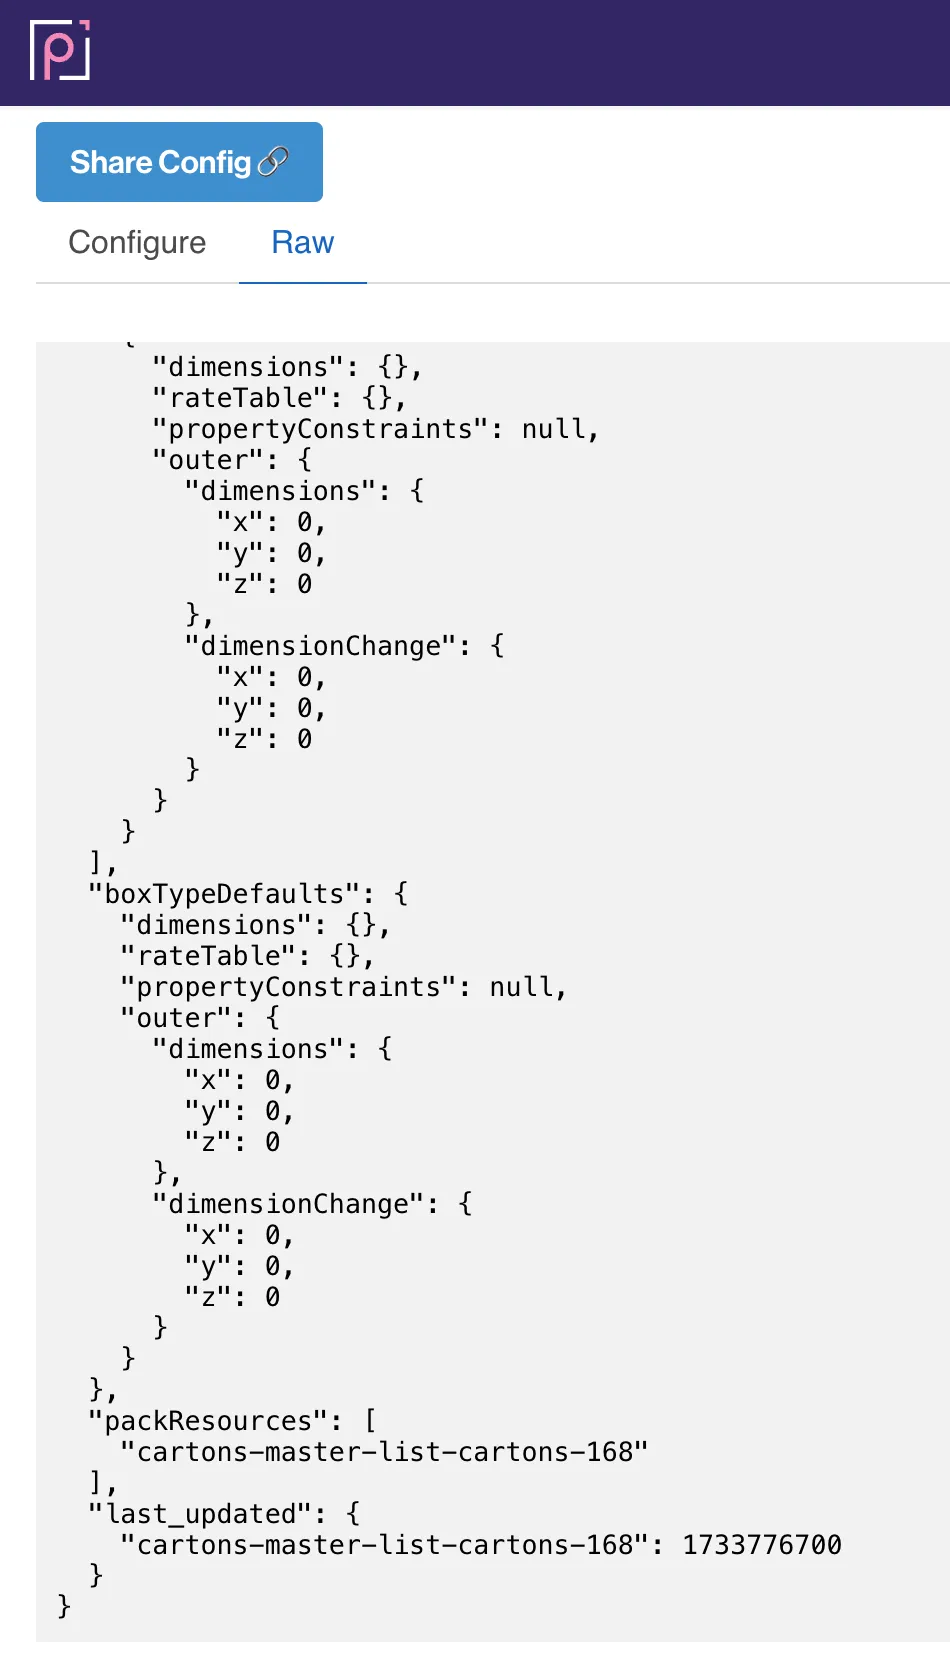
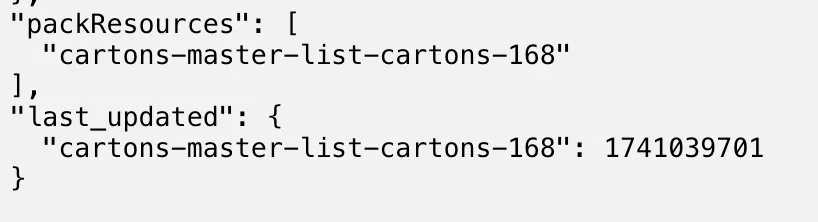
As we can see in the RAW tab of our inspector tool, the Resources property is the same as what was requested in our initial request, and we’ve also got a reference to the time where the resource was last updated. Why are these valuable? It enables users and support staff to understand what version of a resource was used at the time of a pack request.
This is important because it enables references to resources to remain the same while the content of the resources change.
In the request above, our order was cartonized into 2 boxes named “20x18x12” — what if we realized this name was no longer in sync with our ERP system that needs to save the response properly, and we also wanted to remove inaccurate box costs? Instead of creating a new carton resource with the updated names, we can just update our active resource.
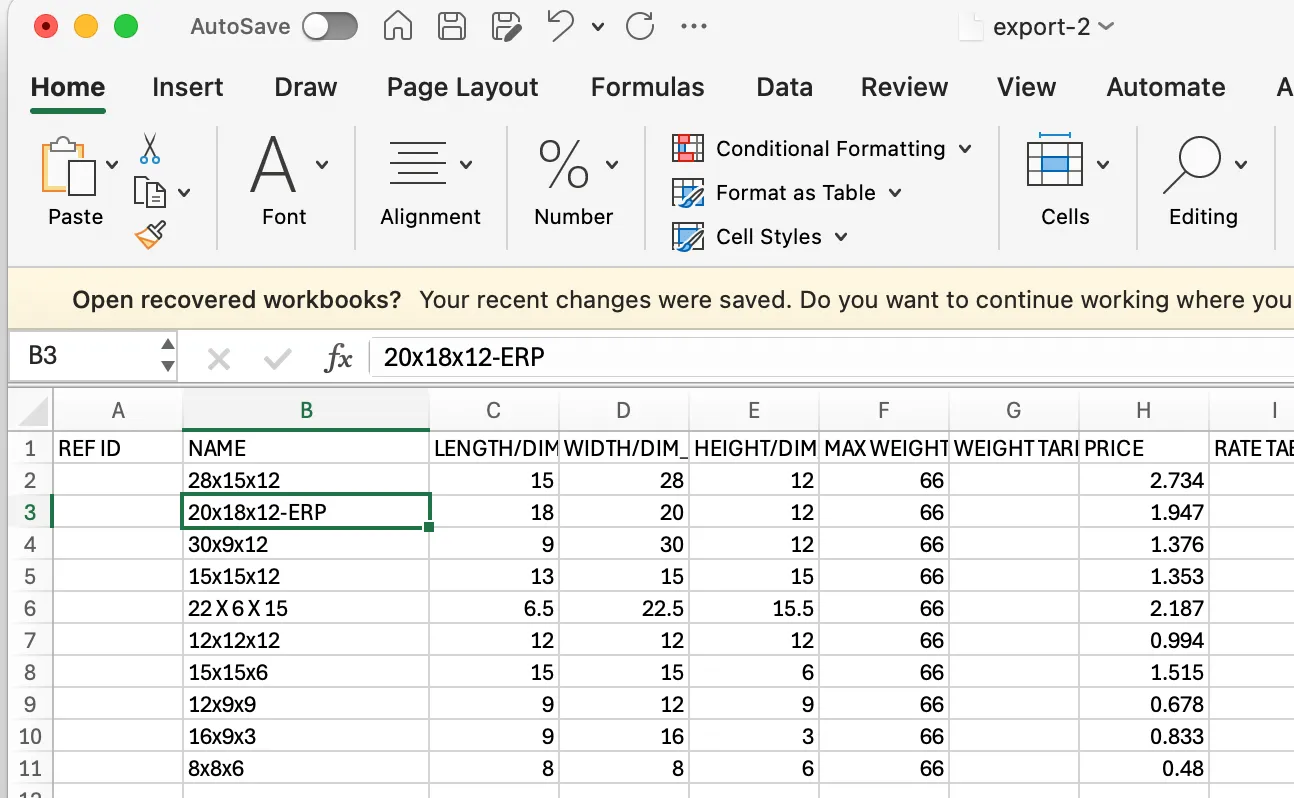
Using the same JSON as the first request, we get a different label on our packed box, one that matches our change in the excel file — our “cost” now reflects the volume of the box as opposed to the erroneous 2 when we first ran the request.
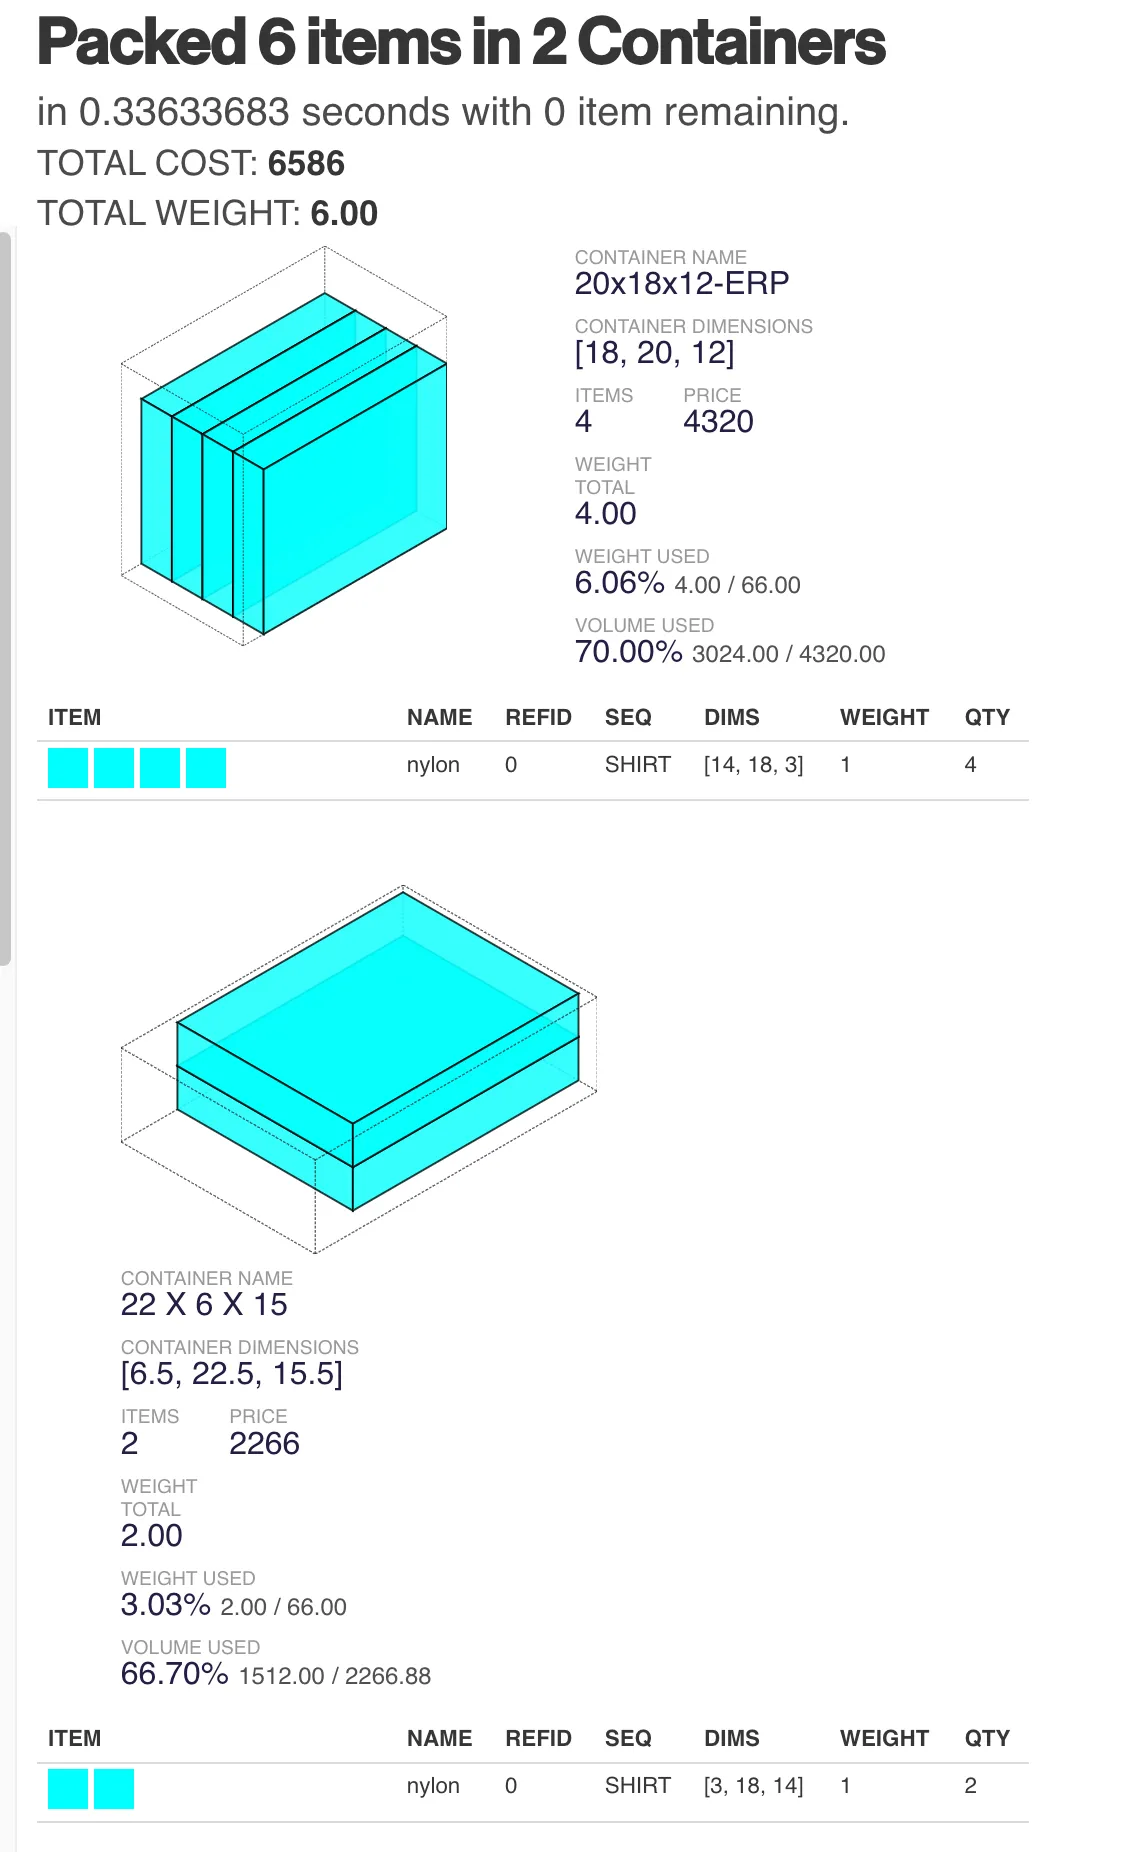
Volume utilization is better across both boxes as well — 70% and 66.7% as opposed to 70 and 30%. Taking a look at the bottom of the Raw tab again, we can see that while the resource is the same, it now has a different last_updated value from when the request was sent earlier.
In conclusion, using Resources to pull cartons into your PacAPI requests enables you to easily configure and control your cartonization integration, removing potential technical barriers to success and speeding up your time to value. You’re able to go from an API request that looks like this:
{
  "itemSets": [
    {
      "name": "nylon",
      "weight": 1,
      "sequence": "SHIRT",
      "dimensions": {
        "x": 3,
        "y": 14,
        "z": 18
      },
      "quantity": 6
    }
  ],
  "boxTypes": [
    {
      "name": "28x15x12",
      "weightMax": 66,
      "dimensions": {
        "x": 15,
        "y": 28,
        "z": 12
      }
    },
    {
      "name": "20x18x12-ERP",
      "weightMax": 66,
      "dimensions": {
        "x": 18,
        "y": 20,
        "z": 12
      }
    },
    {
      "name": "30x9x12",
      "weightMax": 66,
      "dimensions": {
        "x": 9,
        "y": 30,
        "z": 12
      }
    },
    {
      "name": "15x15x12",
      "weightMax": 66,
      "dimensions": {
        "x": 13,
        "y": 15,
        "z": 15
      }
    },
    {
      "name": "22 X 6 X 15",
      "weightMax": 66,
      "dimensions": {
        "x": 6.5,
        "y": 22.5,
        "z": 15.5
      }
    },
    {
      "name": "12x12x12",
      "weightMax": 66,
      "dimensions": {
        "x": 12,
        "y": 12,
        "z": 12
      }
    },
    {
      "name": "15x15x6",
      "weightMax": 66,
      "dimensions": {
        "x": 15,
        "y": 15,
        "z": 6
      }
    },
    {
      "name": "12x9x9",
      "weightMax": 66,
      "dimensions": {
        "x": 9,
        "y": 12,
        "z": 9
      }
    },
    {
      "name": "16x9x3",
      "weightMax": 66,
      "dimensions": {
        "x": 9,
        "y": 16,
        "z": 3
      }
    },
    {
      "name": "8x8x6",
      "weightMax": 66,
      "dimensions": {
        "x": 8,
        "y": 8,
        "z": 6
      }
    }
  ]
}
To one that looks like this:
{
  "itemSets": [
    {
      "name": "nylon",
      "weight": 1,
      "sequence": "SHIRT",
      "dimensions": {
        "x": 3,
        "y": 14,
        "z": 18
      },
      "quantity": 6
    }
  ],
  "packResources": [
    "cartons-master-list-cartons-168"
  ]
}
Without losing any functionality.
🎛️ Rules & Settings
Paccurate’s API is robust — we can handle stacking, nesting, exclusion from boxes & items, fragility, and more. Cartonization goals can modified based on customer use-cases: how many boxes can be packed? Are we optimizing for cost? Do items need to be sequenced?
All of these requirements can be handled by our API, but often the ERP, WMS, or TMS connecting to Paccurate is limited in where to store these rules and settings. Resources can help overcoming these limitations.
➕
Creating a Rules & Settings Resource
To create a custom carton resource, log into manage.paccurate.io and navigate to your plan’s Resources page. From the Add dropdown, select “Rules & Settings.”
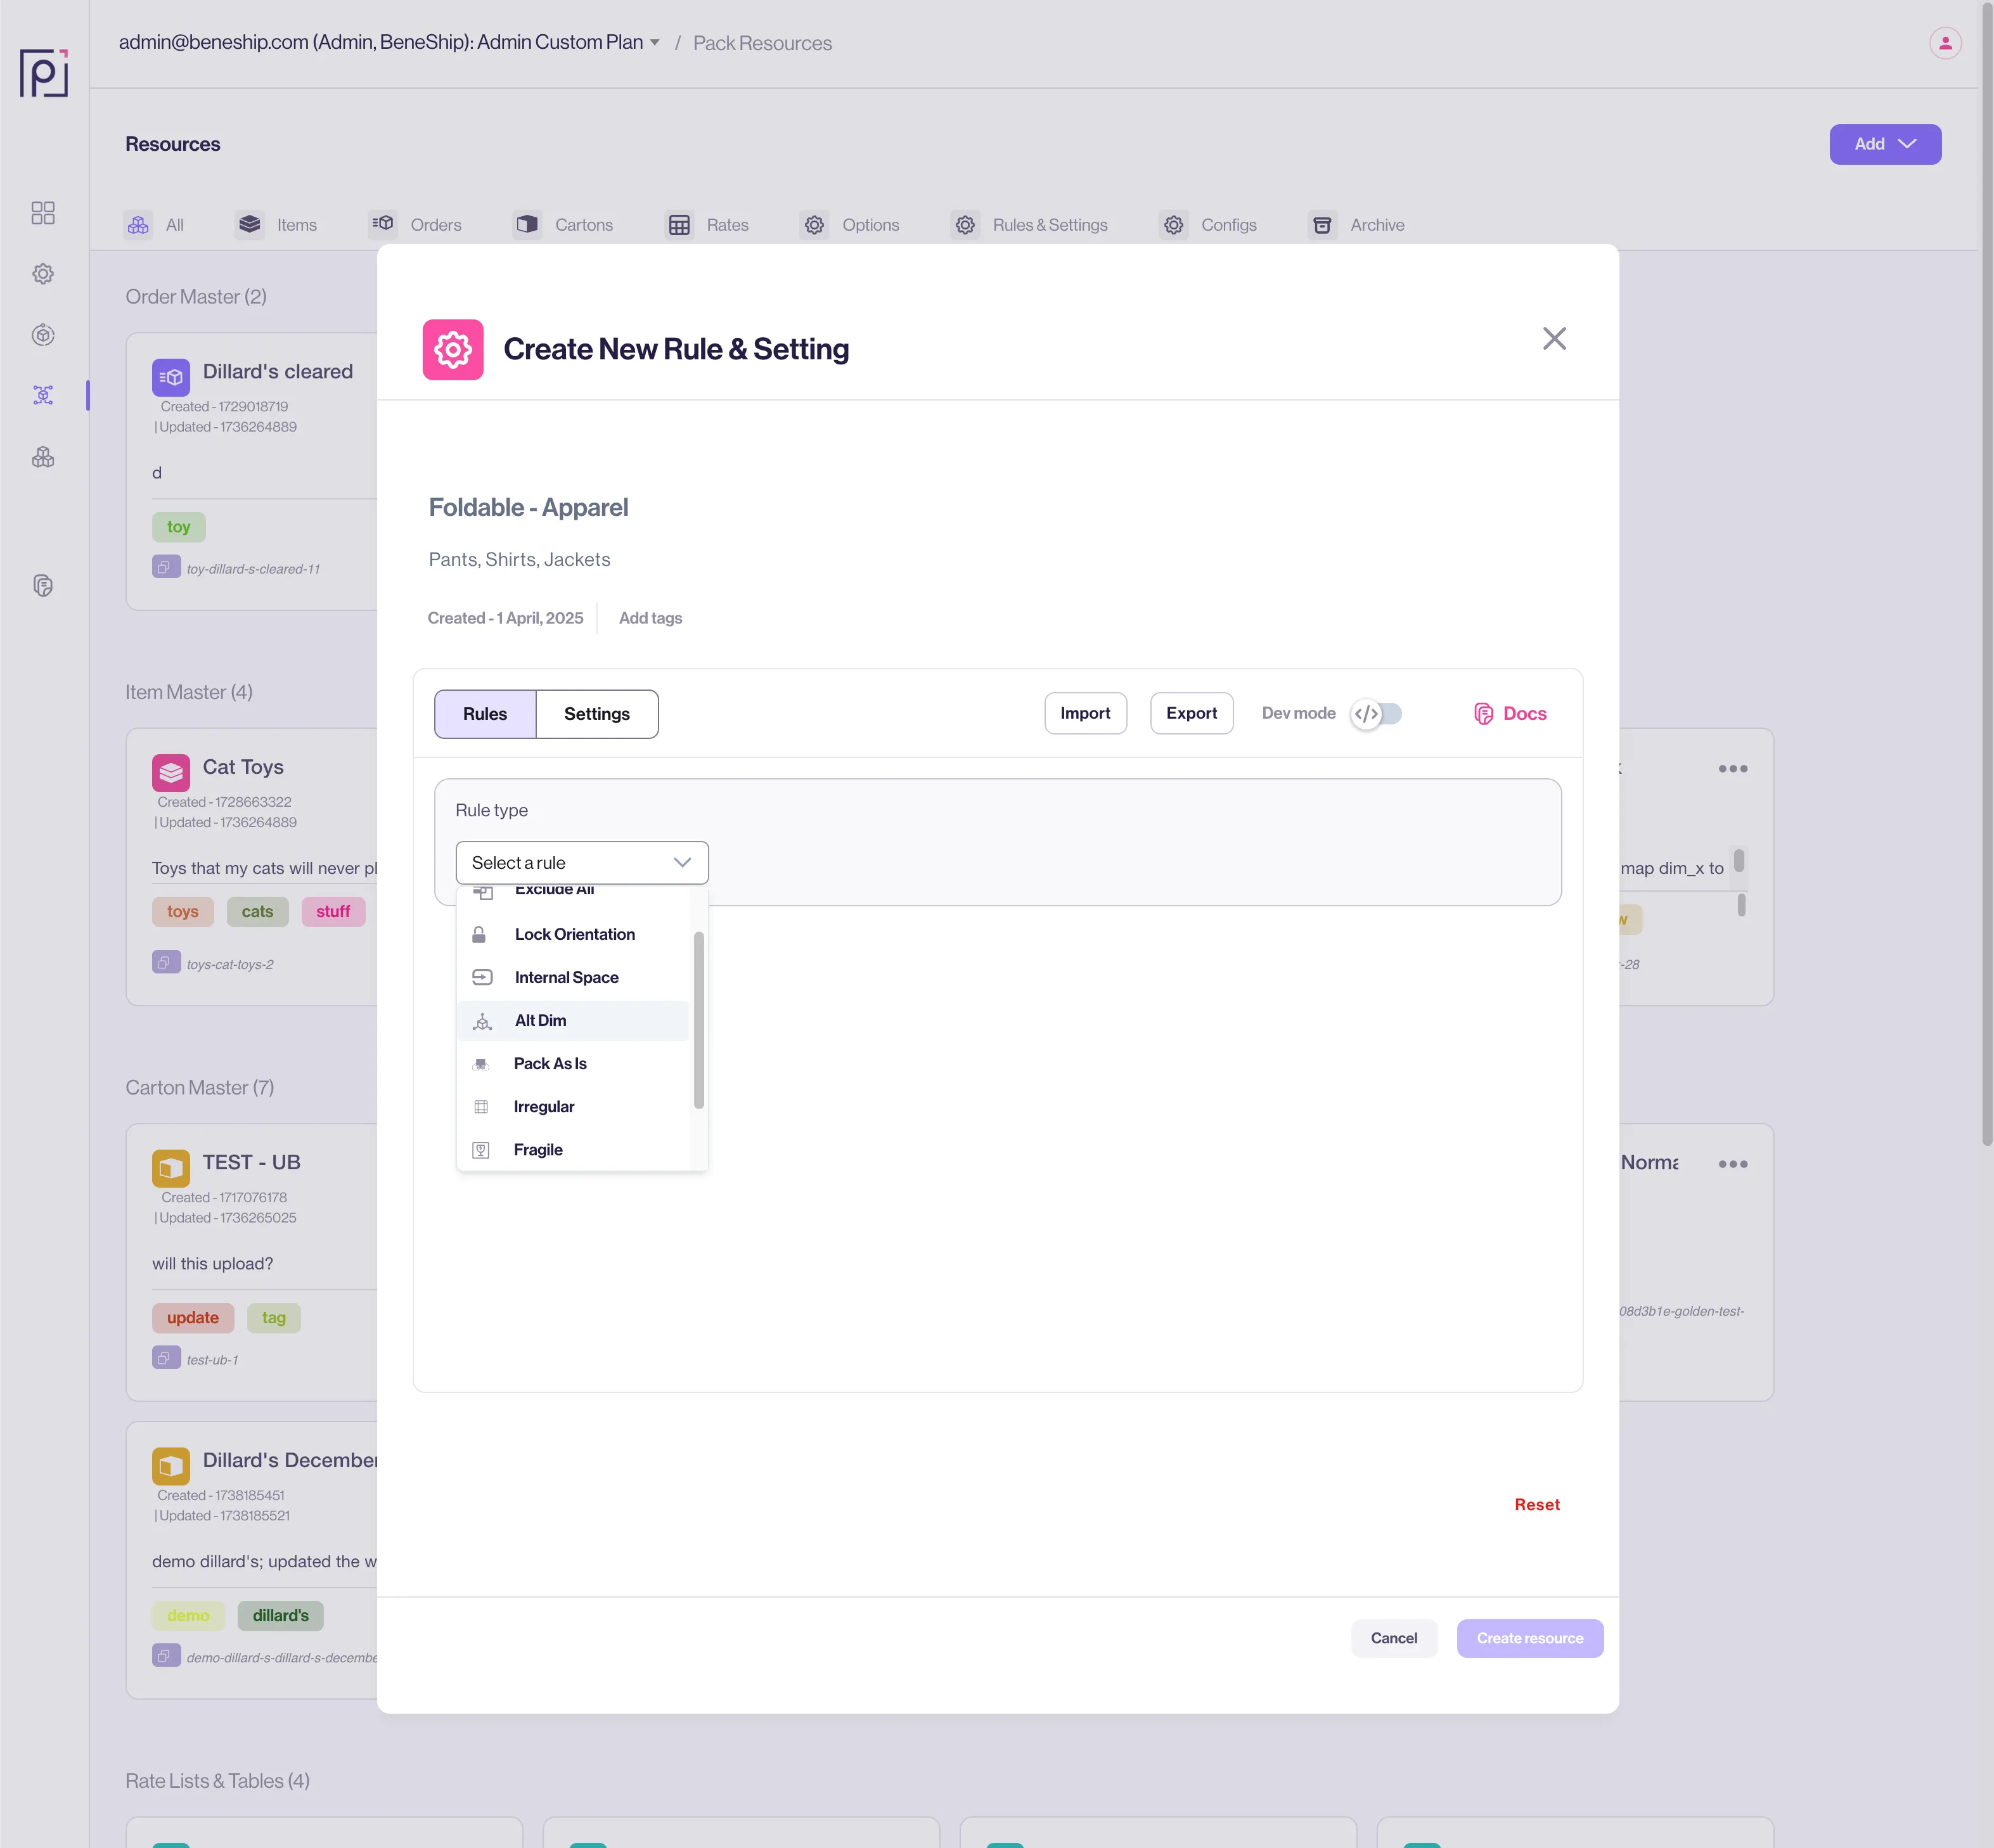
New Rules / Settings Modal
With the modal open, select the rule you are trying to create. Each rule type has its own editor — but first you must select the subject of the rule: the items it will be applied to.
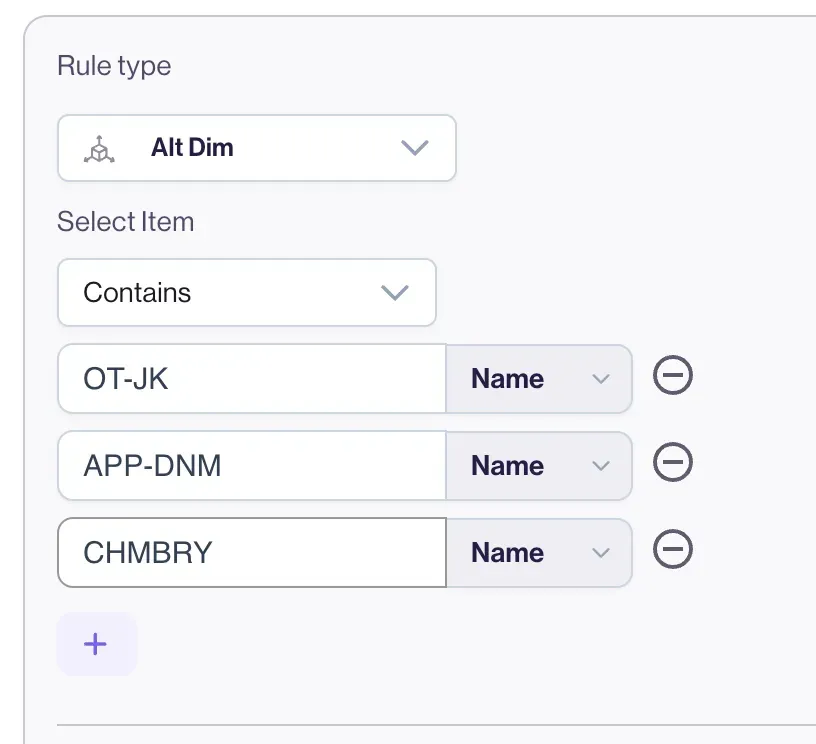
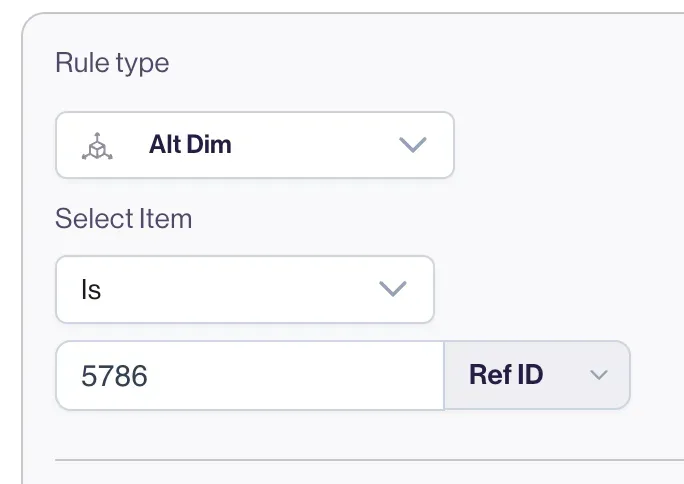
There are three ways of defining a rule’s subject:
- Specifying a single item by refId or sequence property
- Matching an item based on the contents of its name or sequence property
- Matching an item based on what its name or sequence does not contain.
⚠️
This applies to all rules with the exception of exclude-all
✍🏻
Editing Rules
Toggling “dev mode” will expose the JSON that is written by the rules editor. This text field is editable as well, and any changes made to the JSON will be reflected in the UI when it is toggled off.
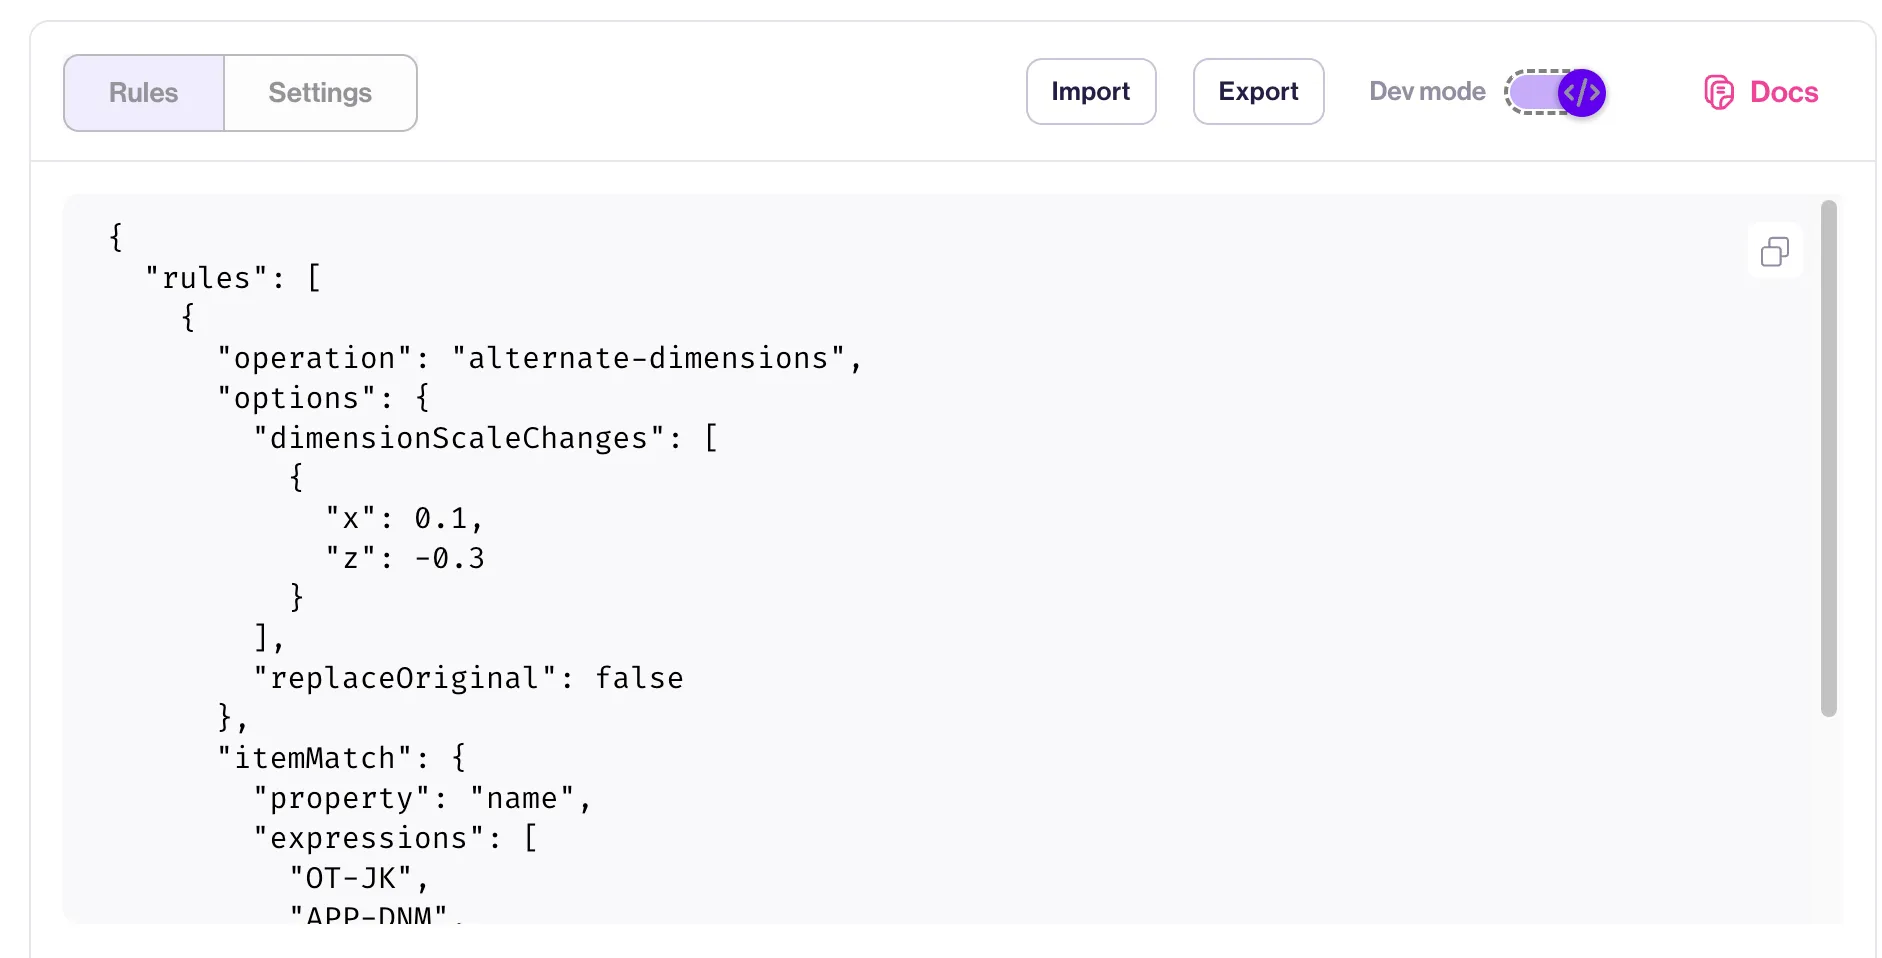
“Dev Mode” state
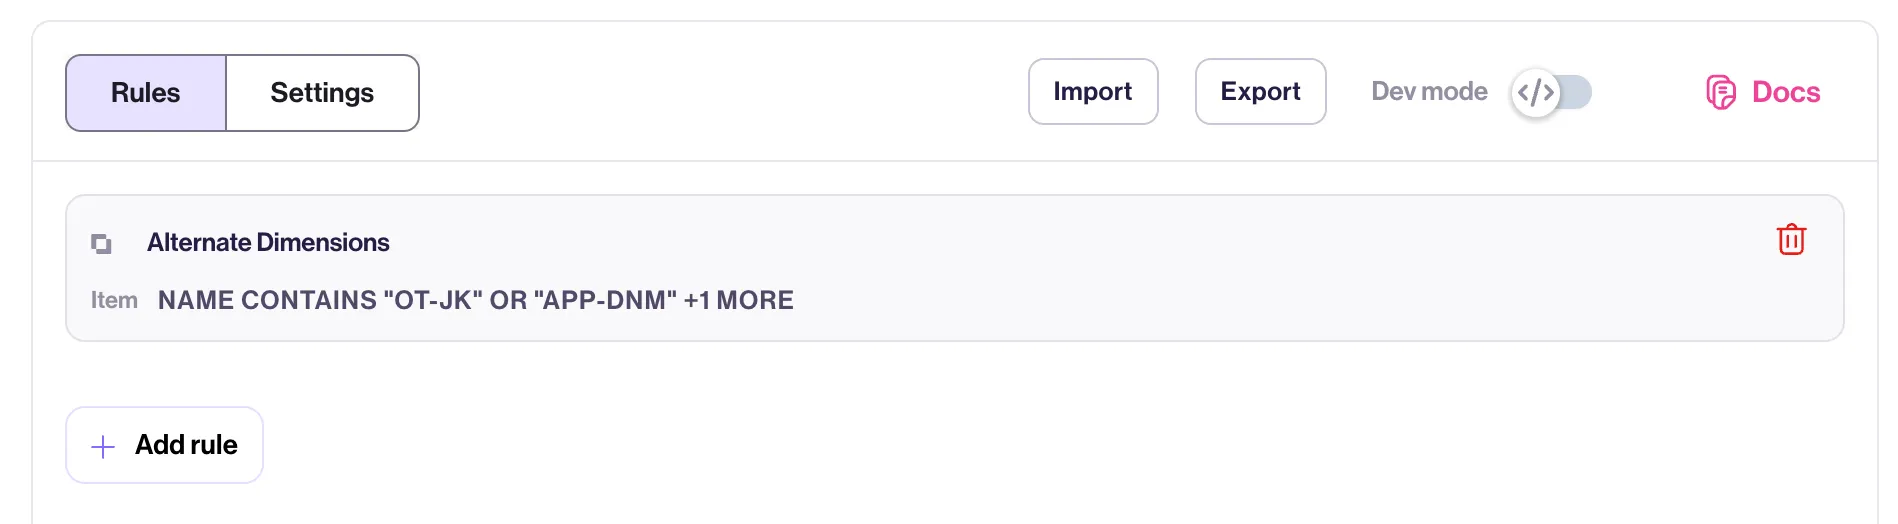
Collapsed list of rules
We’ll leave “replace original” disabled since we do not need to force the dimensional overrides — they will only be used when it provides a better pack. Click “confirm”, and we’re returned to the rules list.
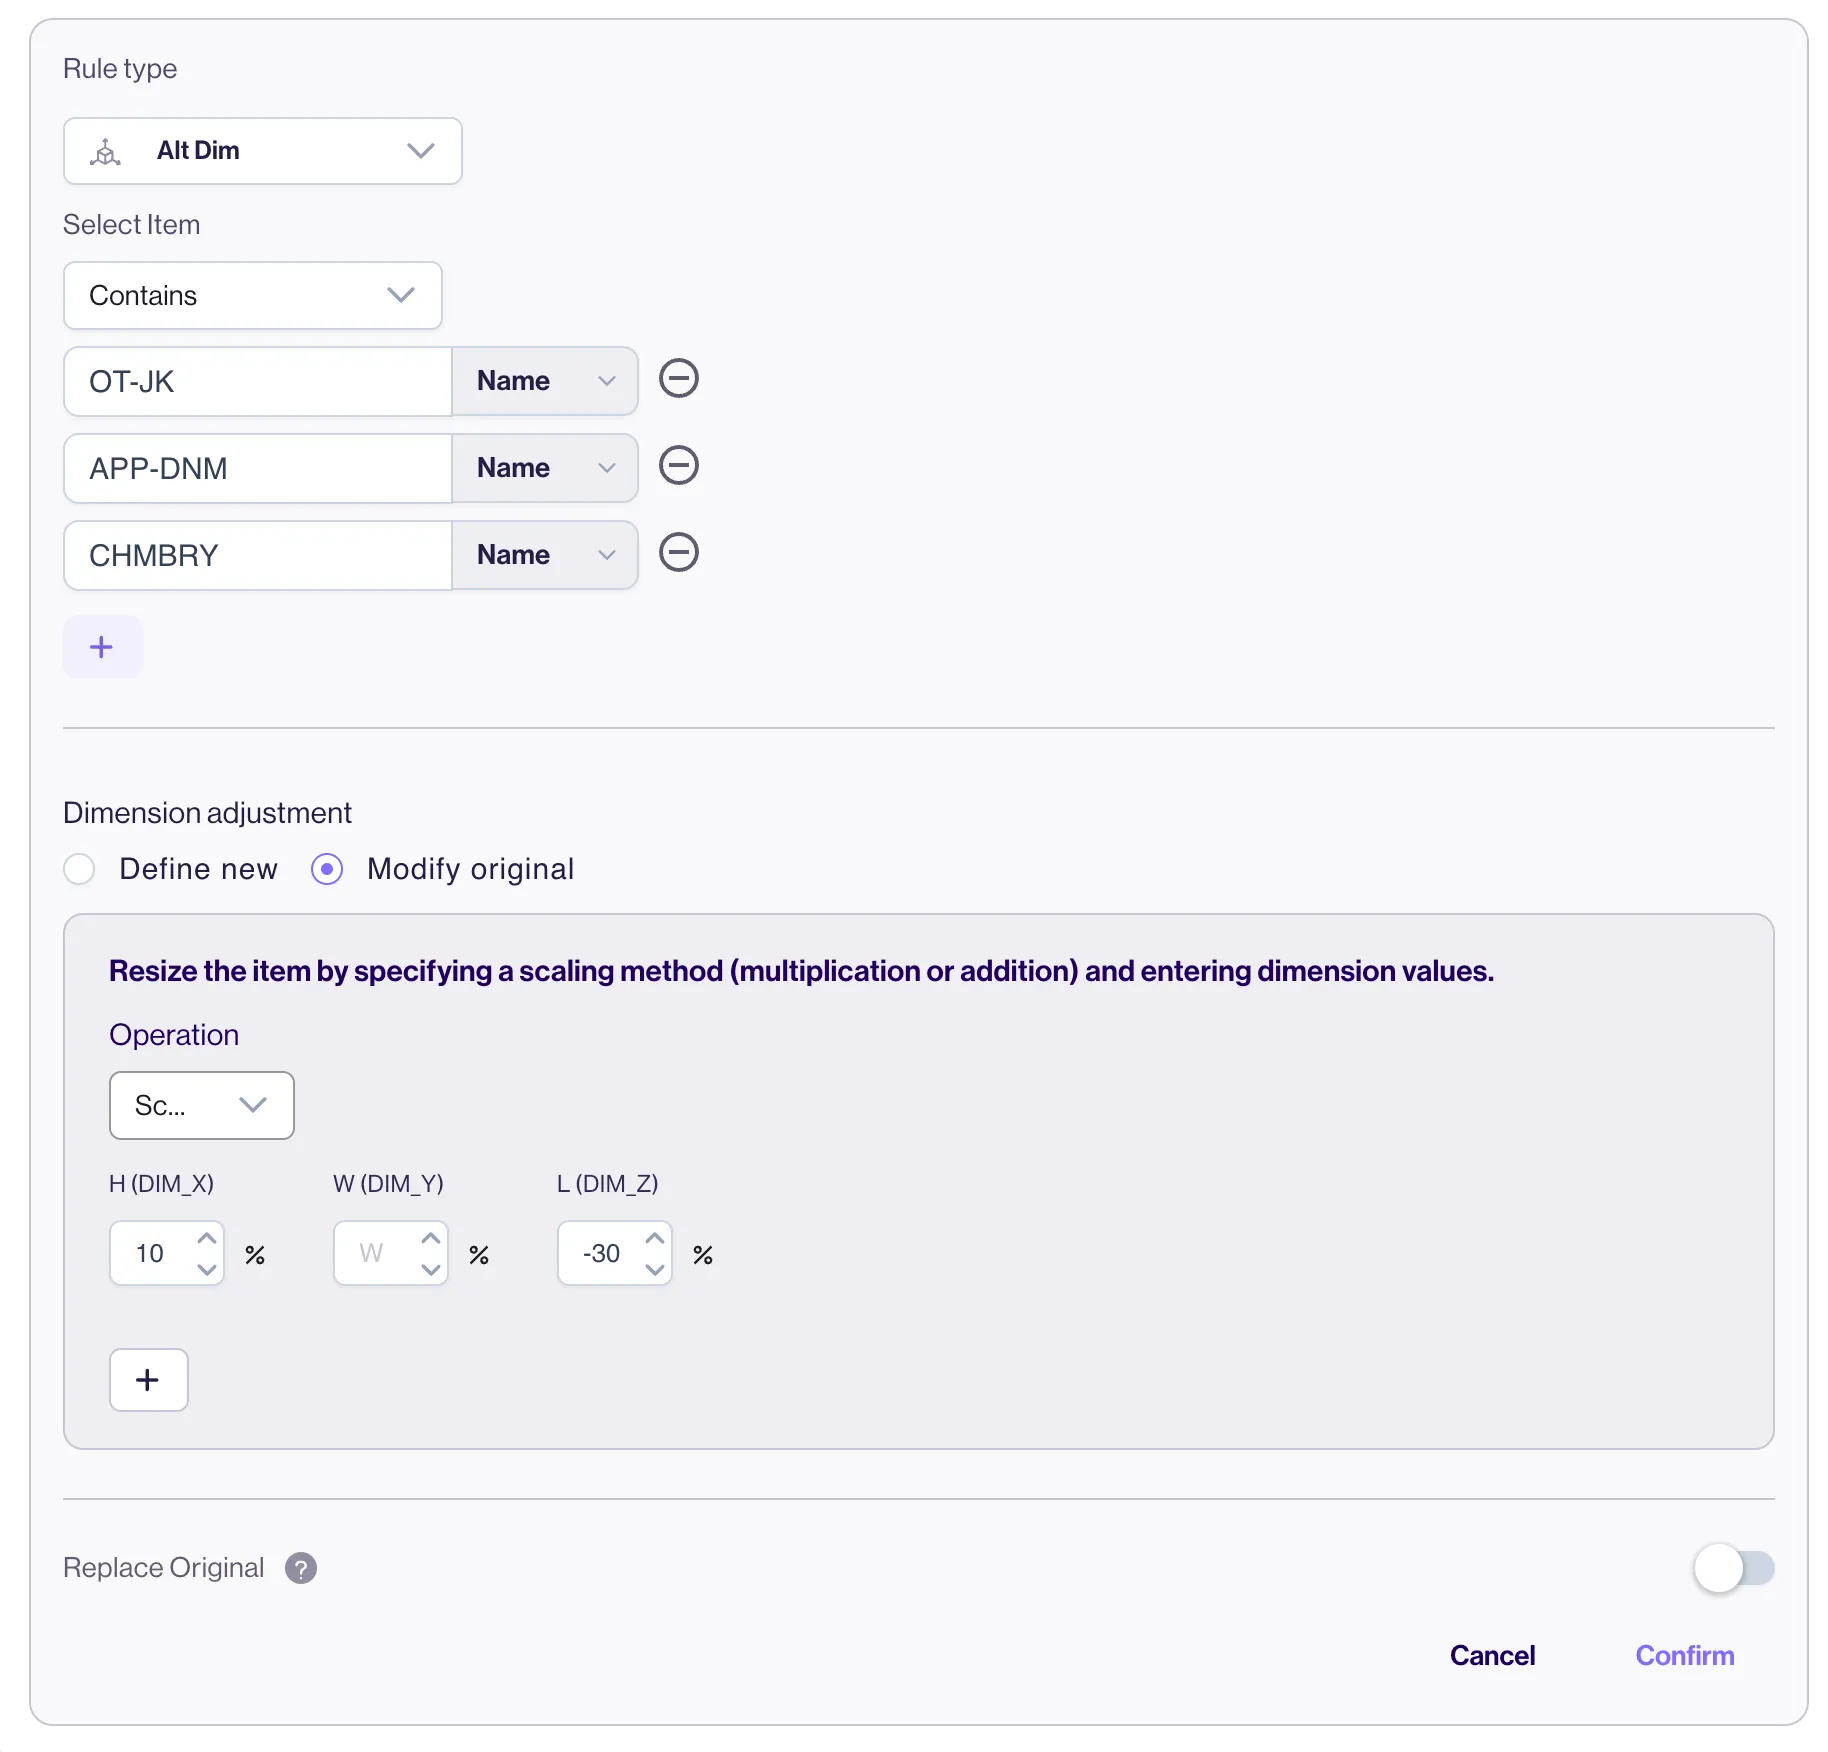
Rule subject interface and Alternate Dimensions UI
With these changes input, we are ready to save our rule. Here is what it looks like in full:
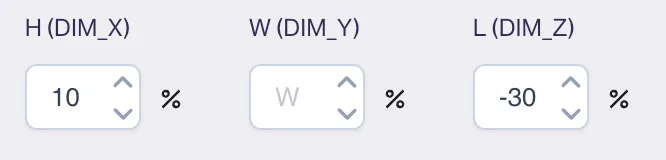
Dimensions scale changes
This rule can get complex, but what we’re trying to do is adjust the item’s dimensions based on what is sent in the request. In the screenshot above, we’ve selected “Modify Original” to achieve this. With this selected, we can either scale the initial dimensional values, or translate the values by a fixed amount (for example, reduce the length by 3). In our case, we want to make the item 30% shorter, so we’ve input -30 in the length field. We can also increase the height by 10% to accommodate the material being folded.
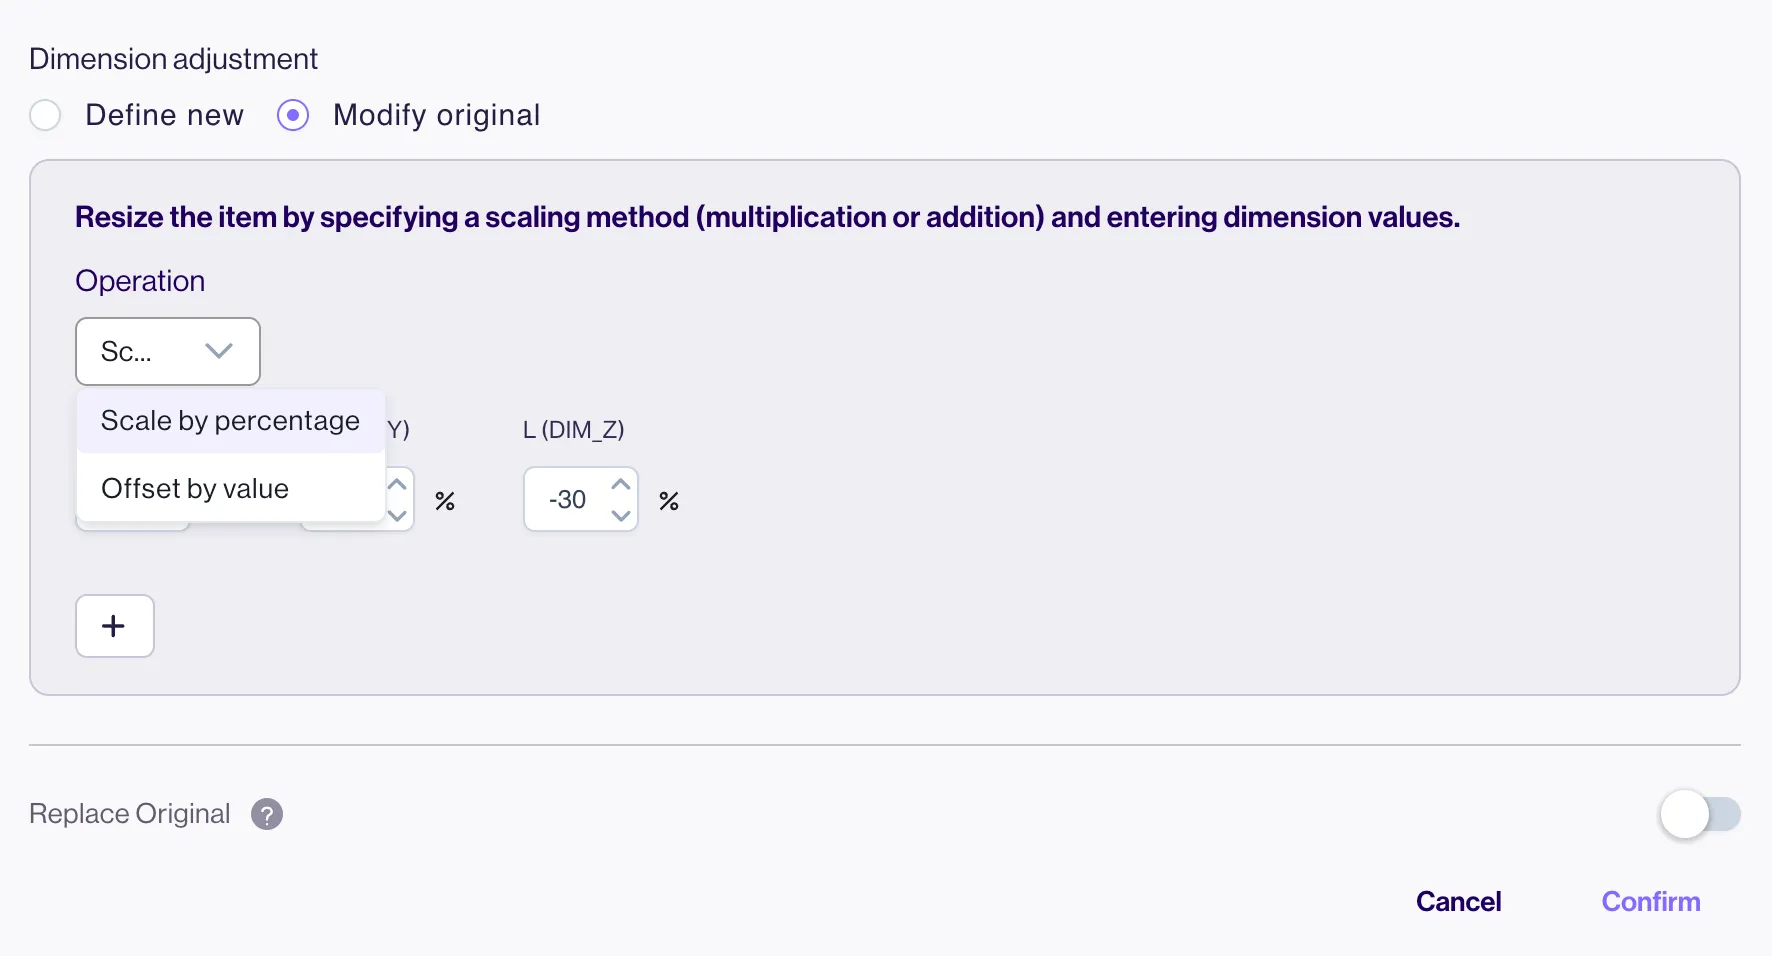
Alternate Dimensions options editor
Once the rule’s subject has been defined, you can then configure its behavior. Let’s take a look at how to configure the Alternate Dimensions rule:
⚙️
Adding Settings
Before we save this rule, let’s add an additional setting: a Box Type Choice Goal. We want to set it to “lowest-cost” because in this scenario we know we’re going to be using some custom rates.
To add a setting, click the “Settings” tab above the rules list. Next, click the + icon next on the “Carton Type Setup” section, and select “Box Type Choice Goal”.
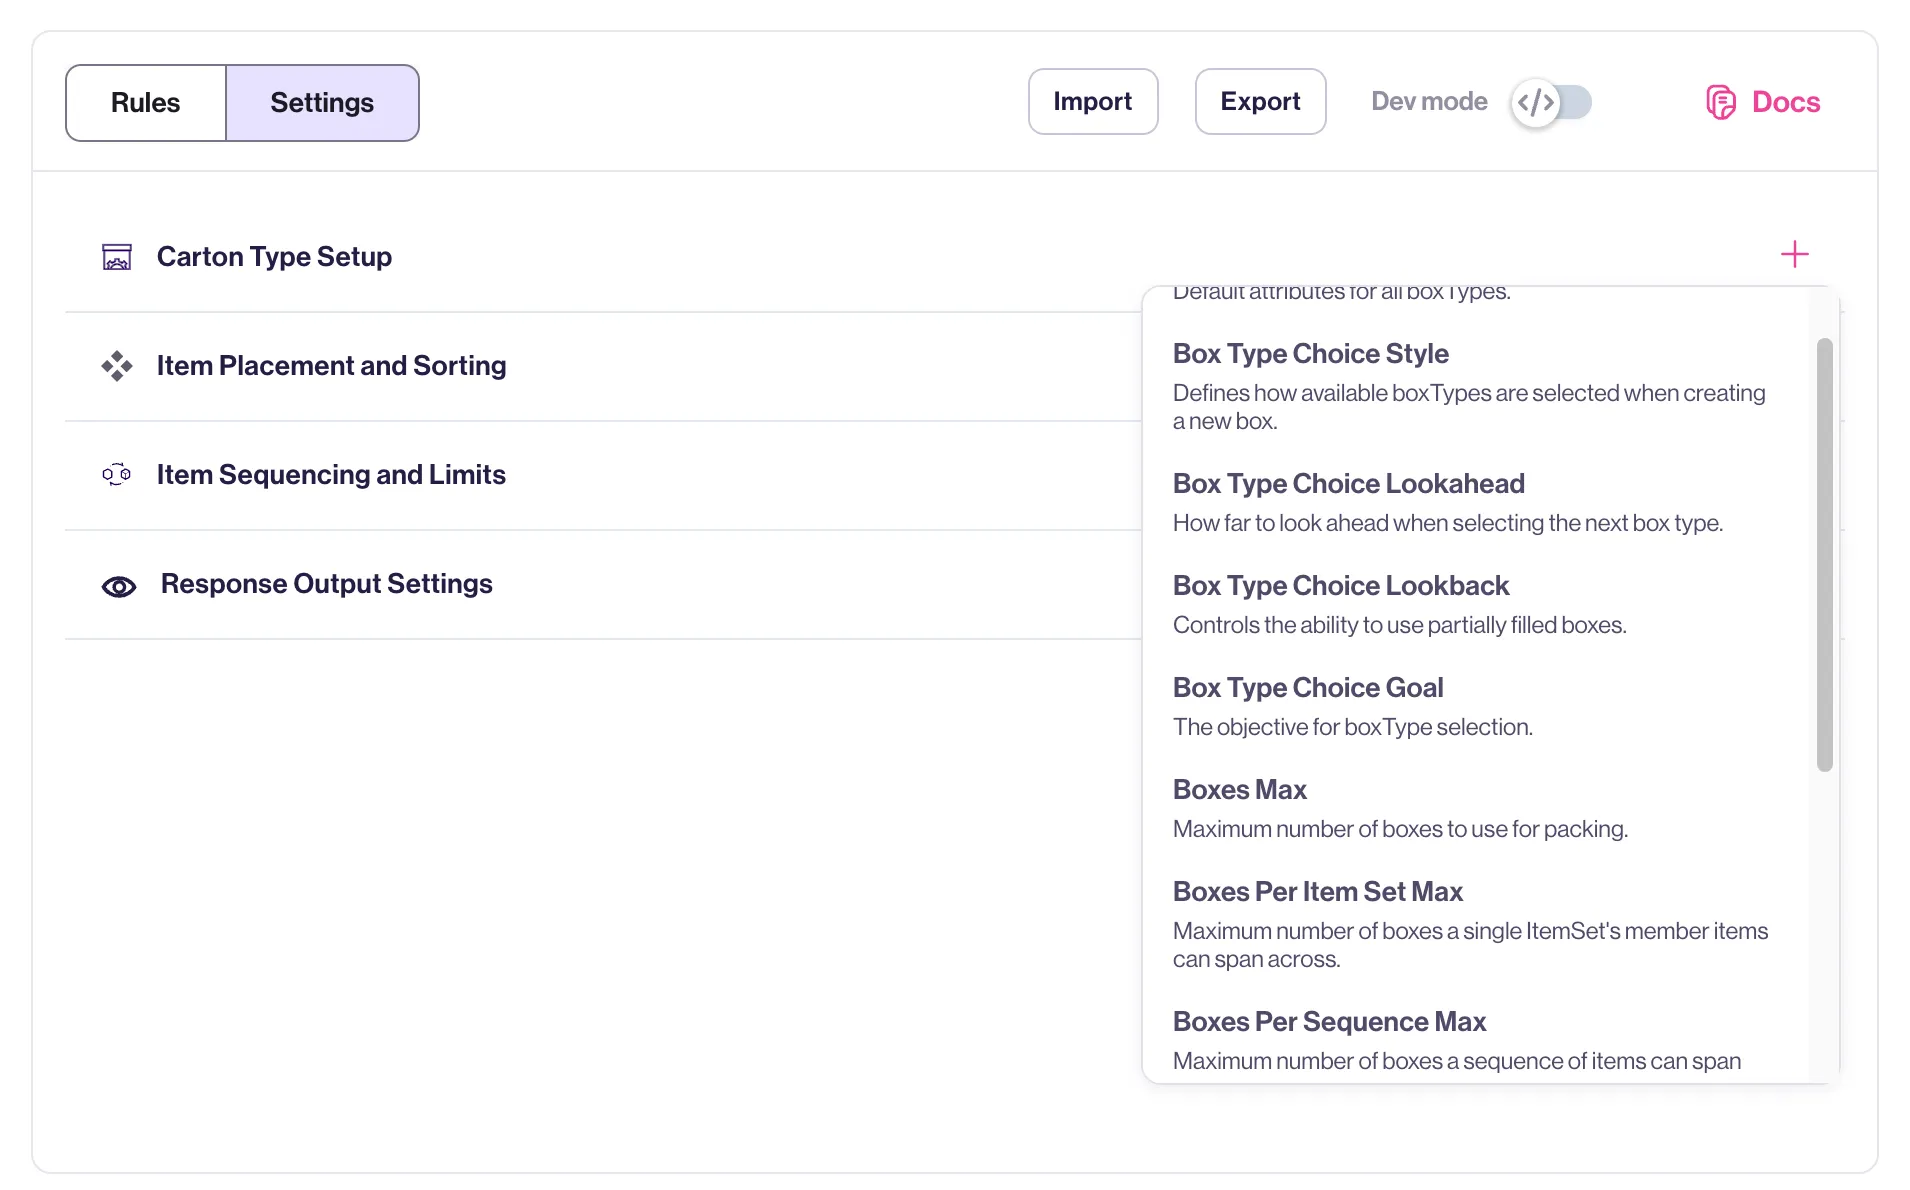
Settings screen with “Carton Type Setup” submenu active
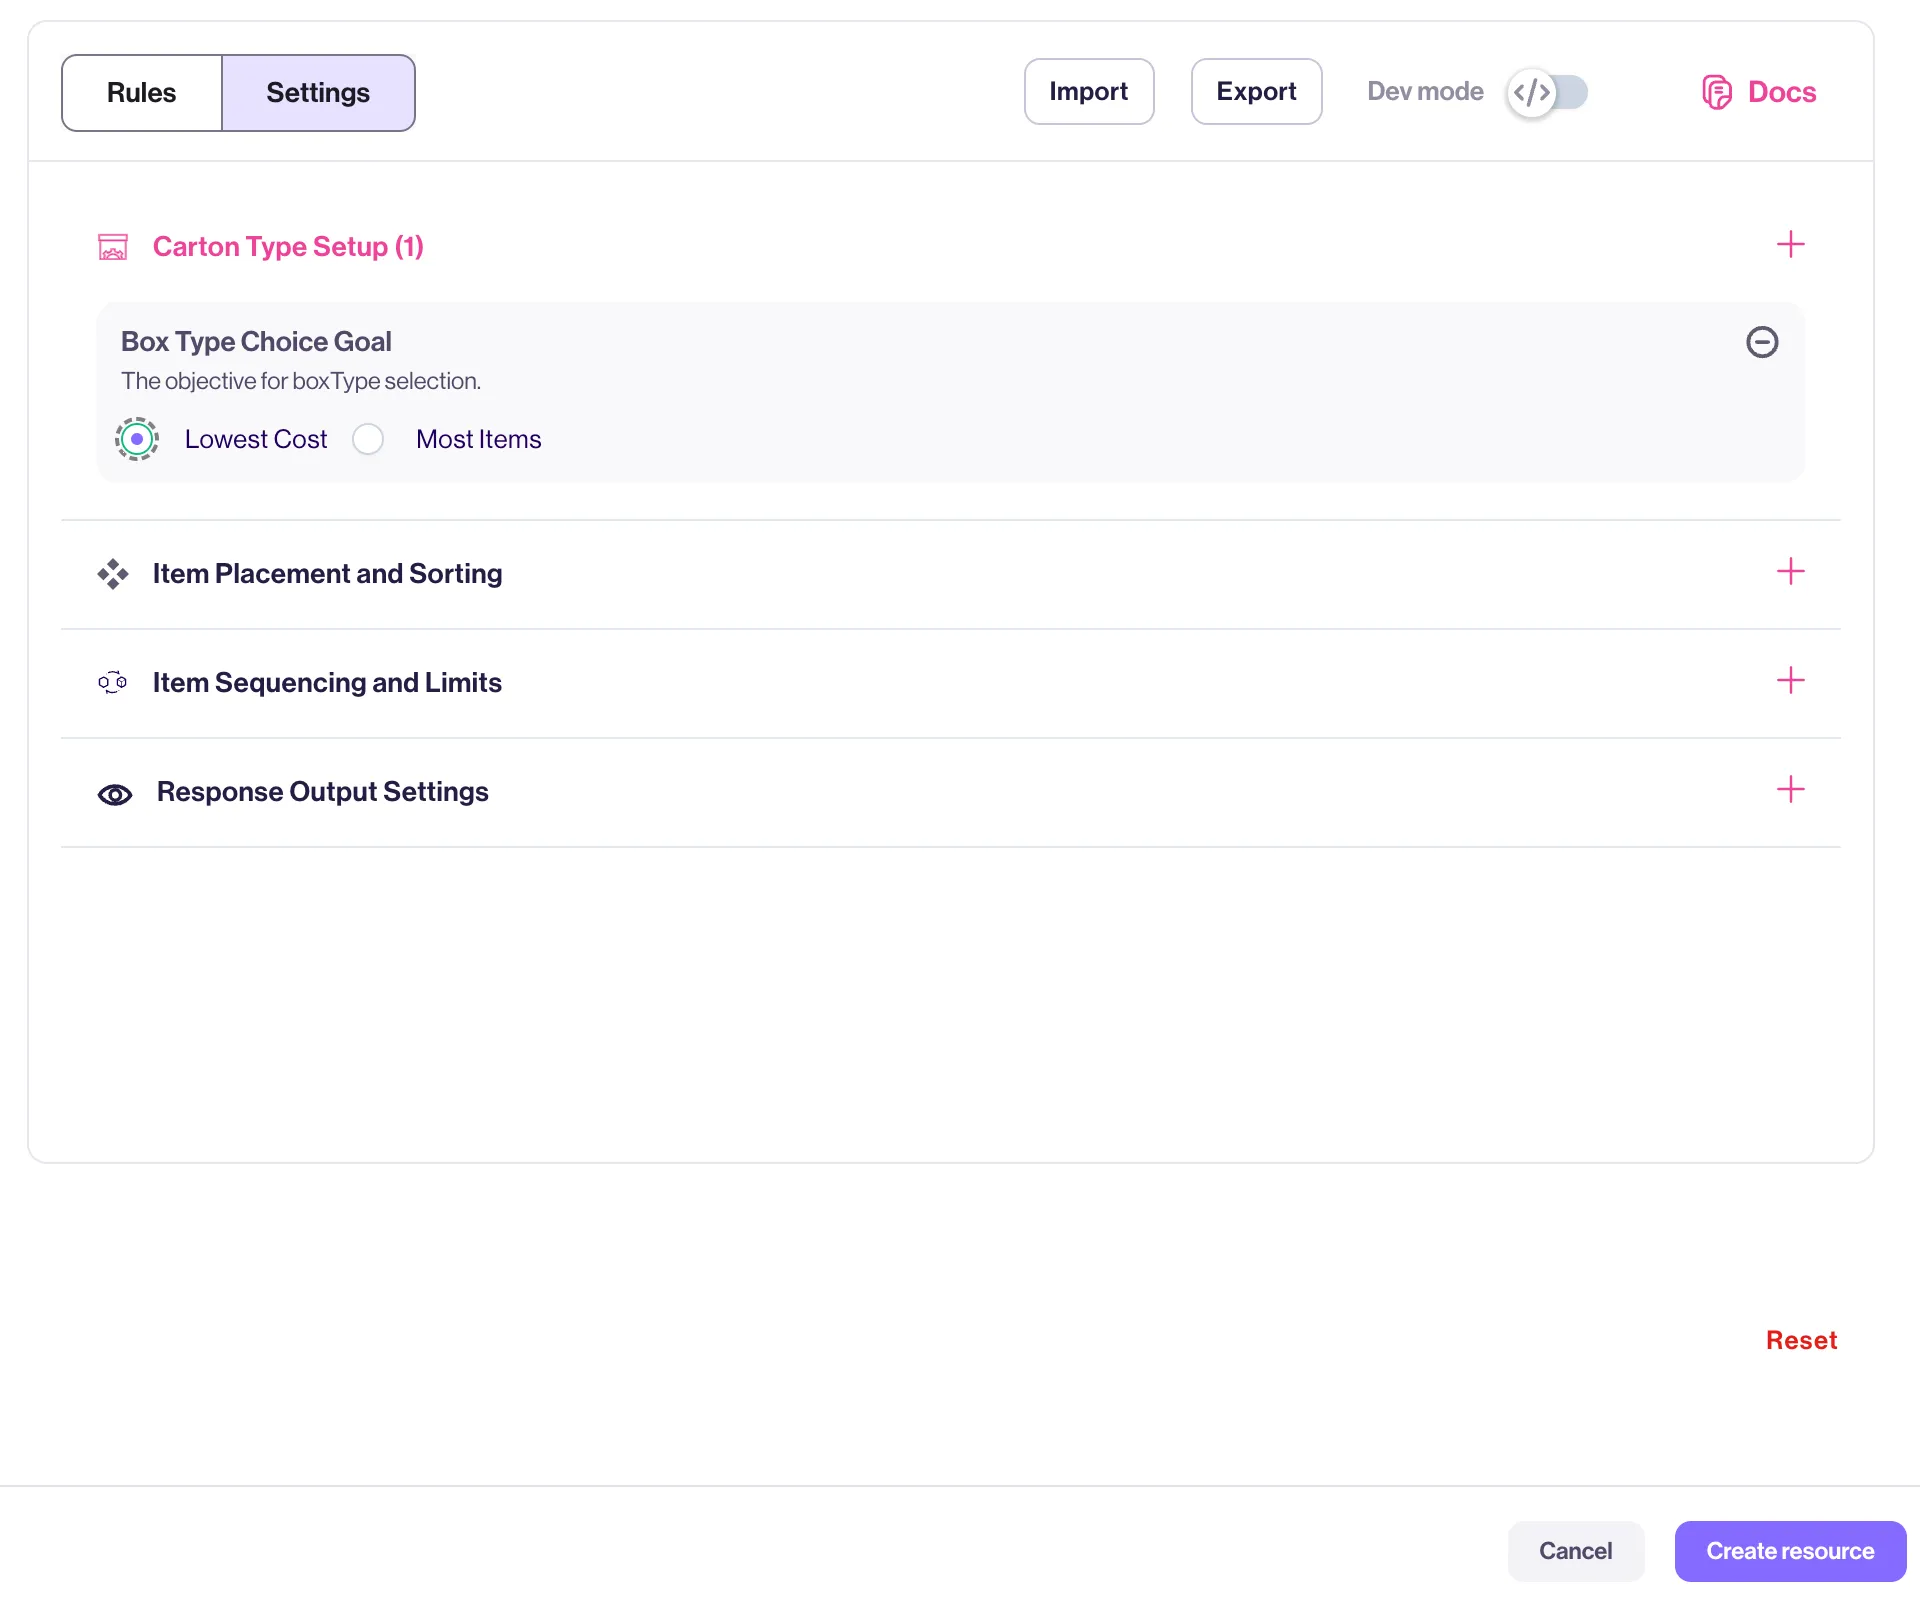
Box Type Choice Goal setting with “Lowest Cost” selected
Make sure the “Lowest Cost” option is selected
💾
Saving Rules & Settings
Click “Create Resource”. The new resource will be saved, and the card will show up in the Rules and Settings section of your resources homepage. Click the card to open the rules resource and make any changes you may need.
⚡ Using Rules & Settings in a Request
To use this resource, include it in a JSON payload like below, and send it to https://resources.api.paccurate.io
(don’t forget your Authorization headers!)
{
  "itemSets": [
    {
      "name": "nylon",
      "weight": 1,
      "sequence": "SHIRT",
      "dimensions": {
        "x": 3,
        "y": 14,
        "z": 18
      },
      "quantity": 6
    }
  ],
  "packResources": [
    "alternate-dimensions-lowest-cost-foldable-apparel-40"
	  ]
}
Congratulations, you’ve saved an IT team a bunch of time and energy!
📊 Rates
Paccurate’s API is cost-aware, meaning it compares the “cost” of any possible pack configuration and will return the lowest cost version of the packed items. Enabling cost awareness works best when a zone-specific rate card (a list of weights with a corresponding list of rates for each weight) is sent along with each request. With Resources, Paccurate is able to store multiple custom rate tables in one resource, and the resource-enabled endpoint will assign the appropriate rates and weights based on the requested carrier service and zone.
➕
Creating a Rates Resource
To create a rate table resource, log into manage.paccurate.io and navigate to your plan’s Resources page. From the Add dropdown, select “Rate List & Table.”
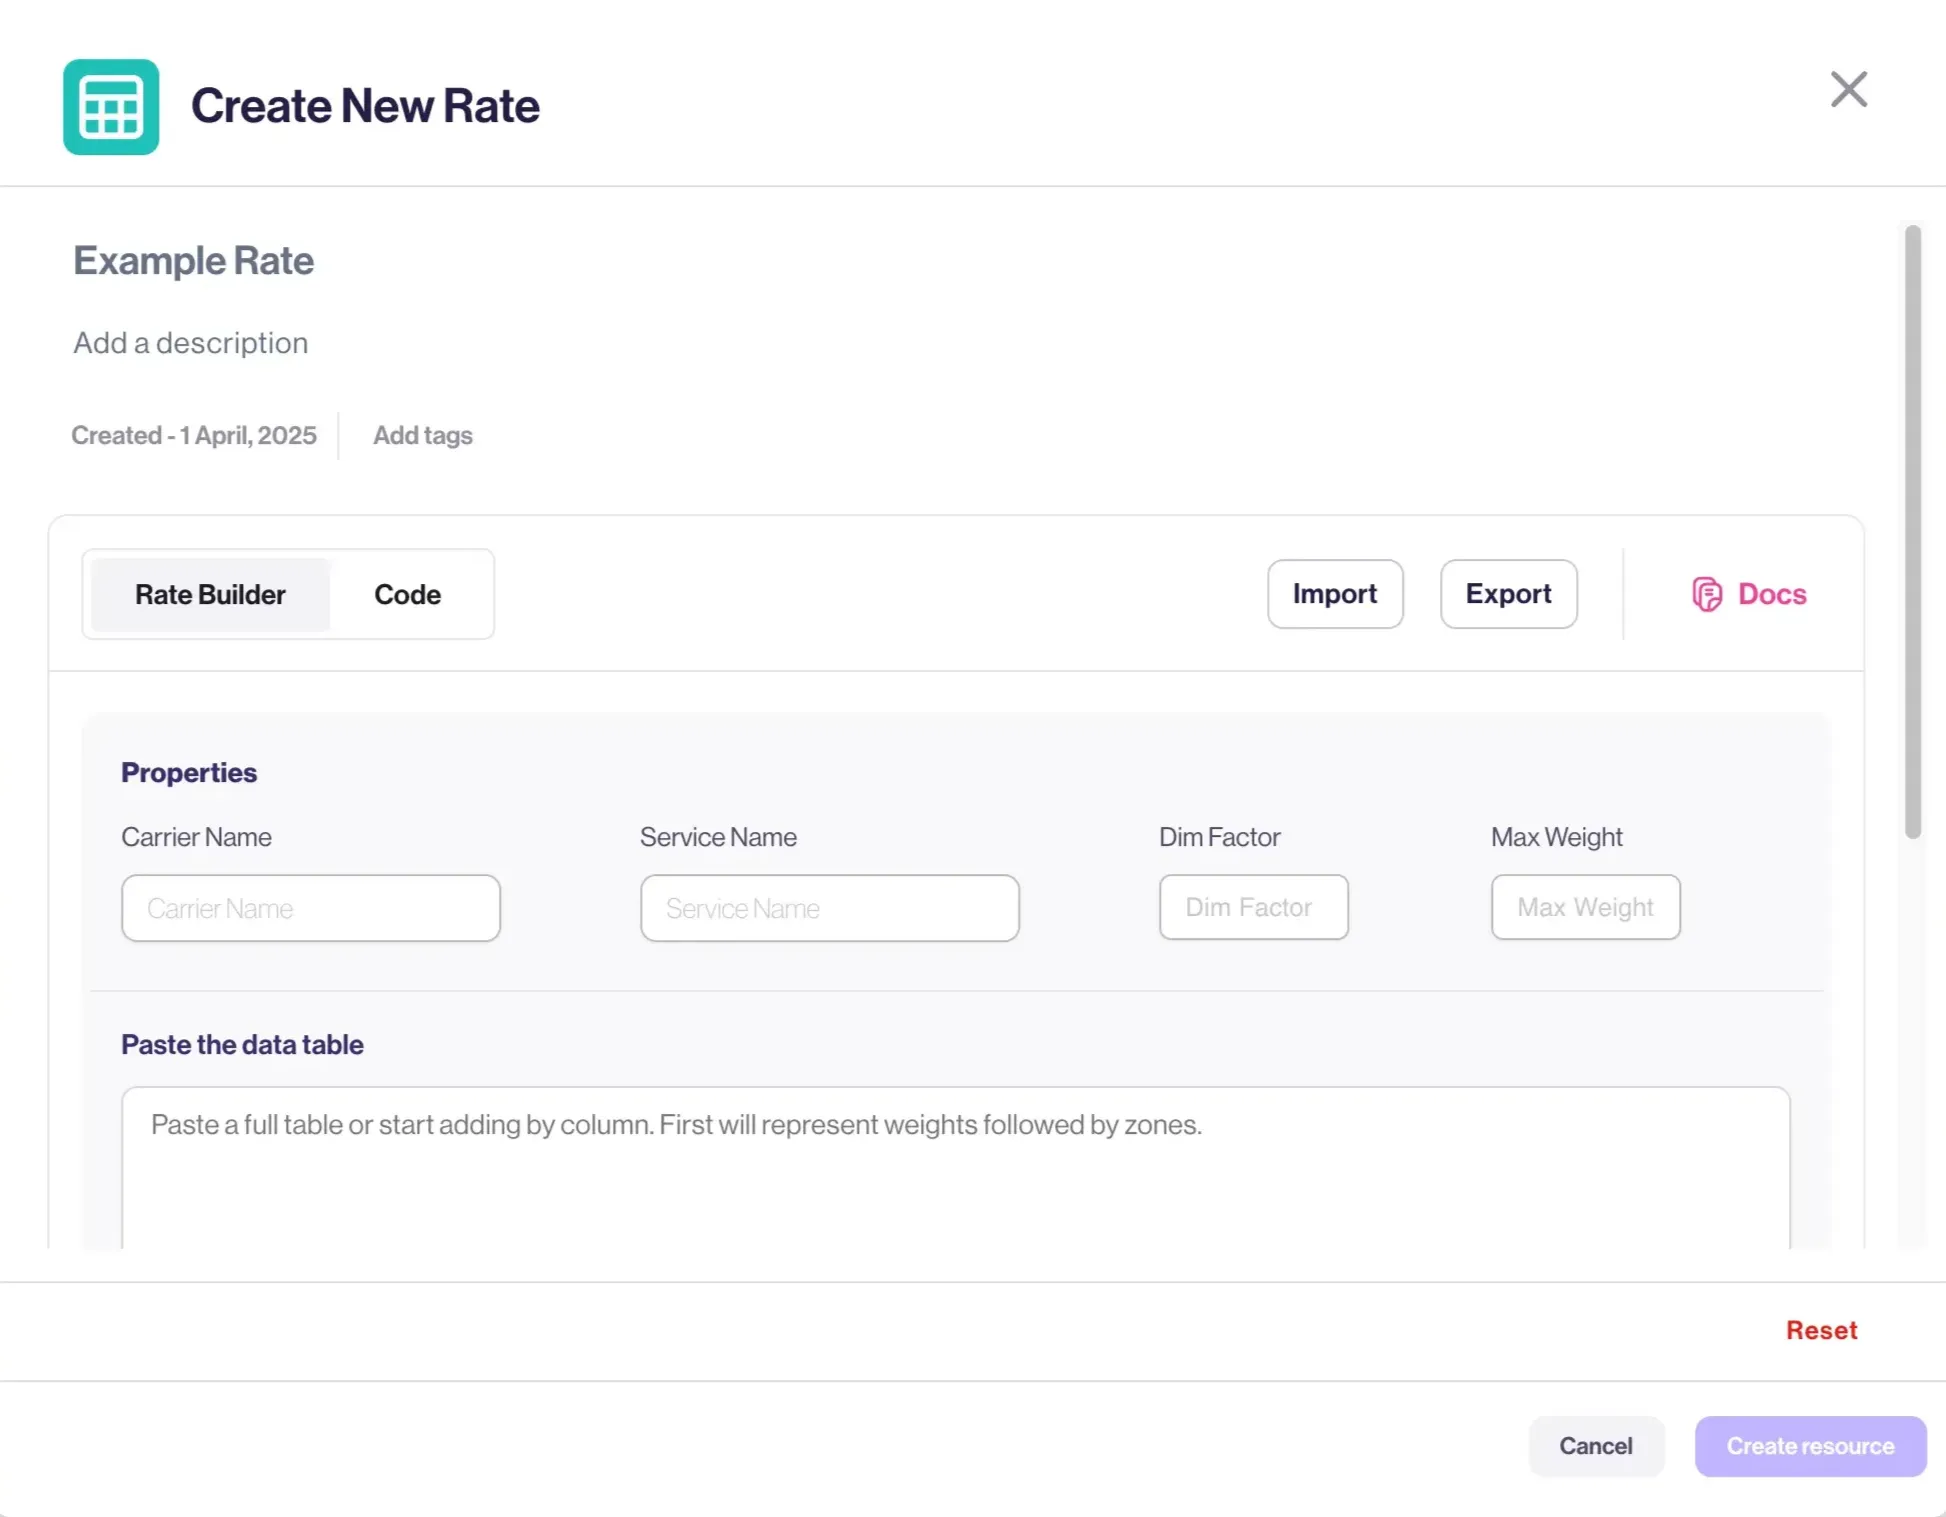
Create rate modal
After filling out the properties on the form (all fields are required except for “Max Weight”, you have two options for entering your table data:
- Paste the complete table data directly.
- Copy your CSV, Excel, or text data and paste it into the form. The system will automatically parse the code accordingly.
- Paste in a weight and at least one zone column.
- Provide the weight along with at least one zone column to enable the proper parsing of the table data. (You will get an error if you do not provide at least two columns)
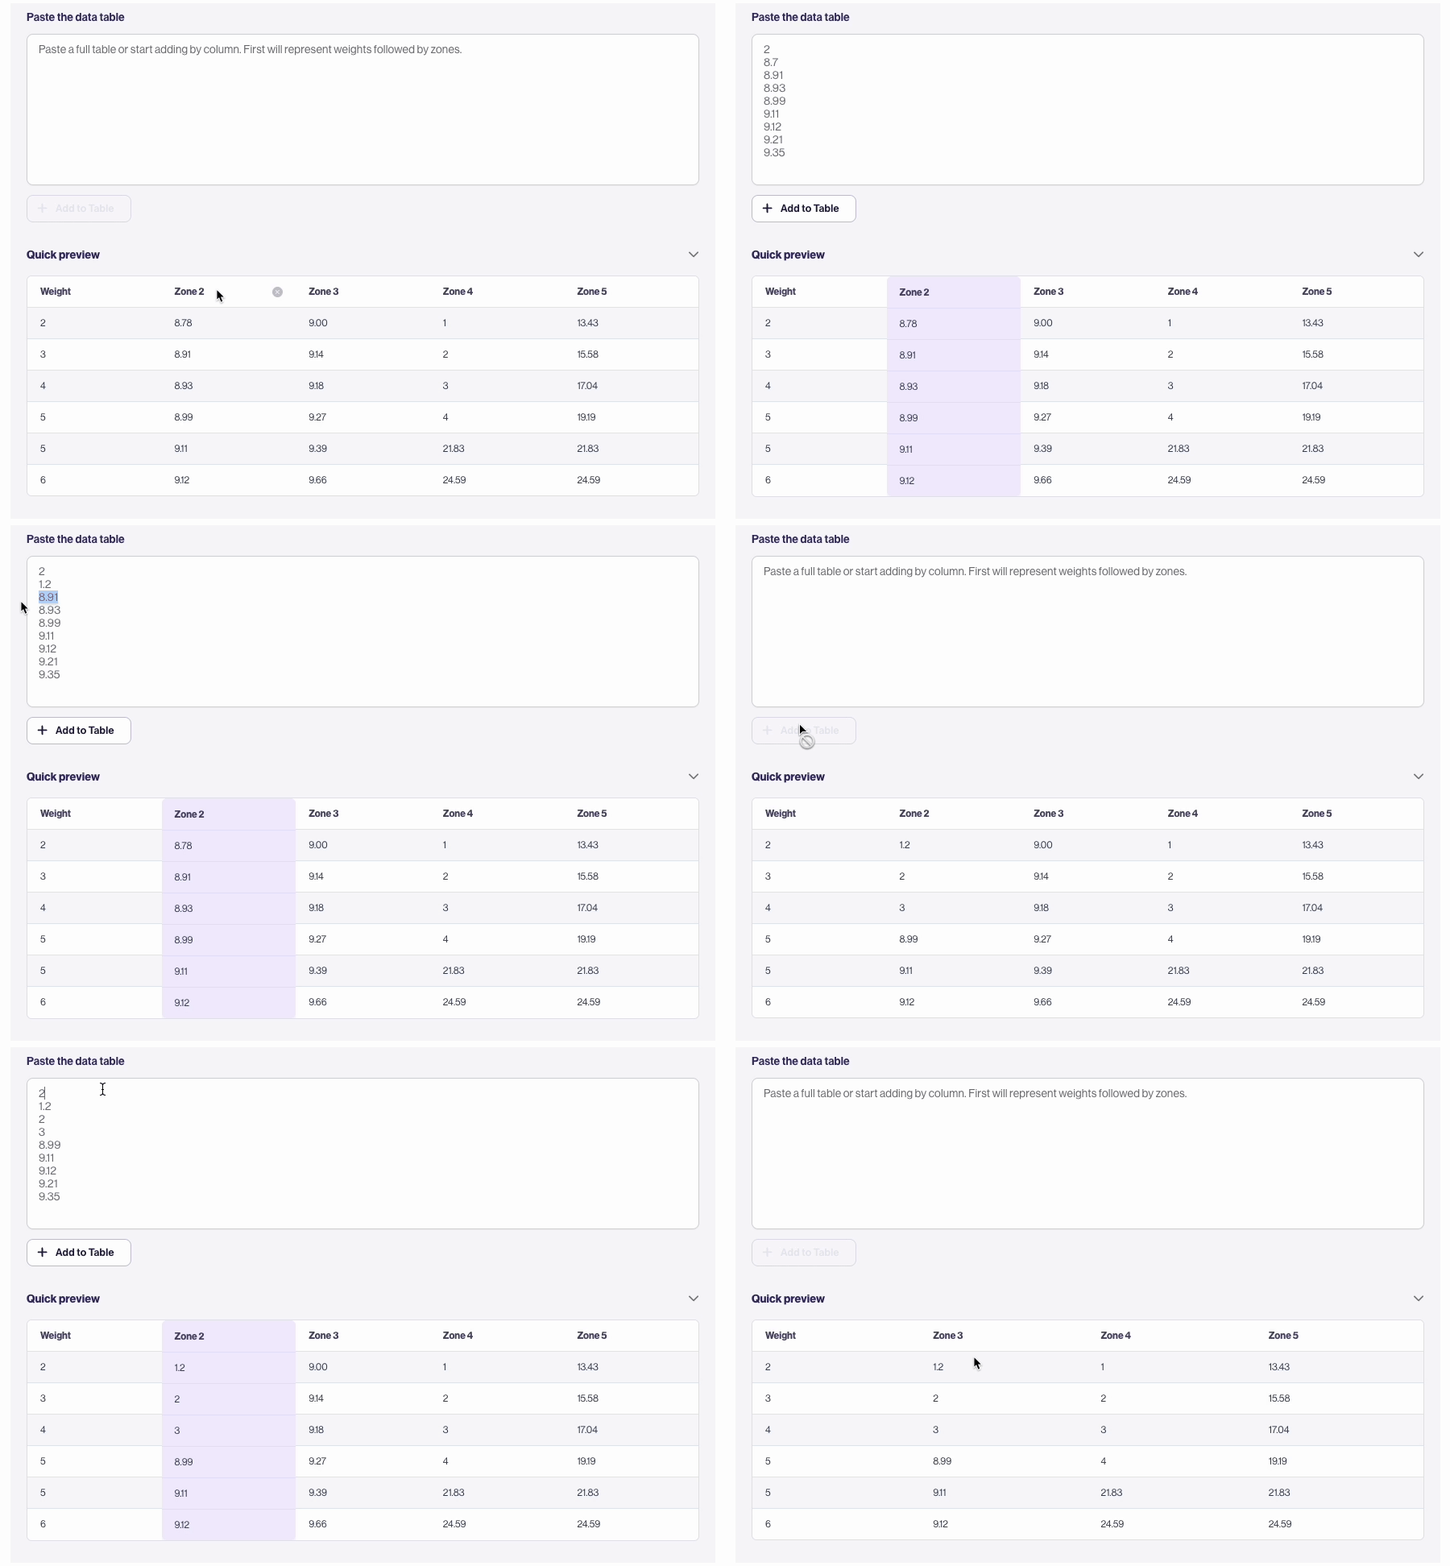
Whether you paste the complete table directly or just the weight and zone column, make sure that the first row represents the header. The first column should always represent the weight, while zones can either be just a number or prefixed with the word “zone” followed by a number.
When you’re done, click “Add to Table” to generate a table preview of the pasted data. (The table only shows the first 5 rows of the pasted data)
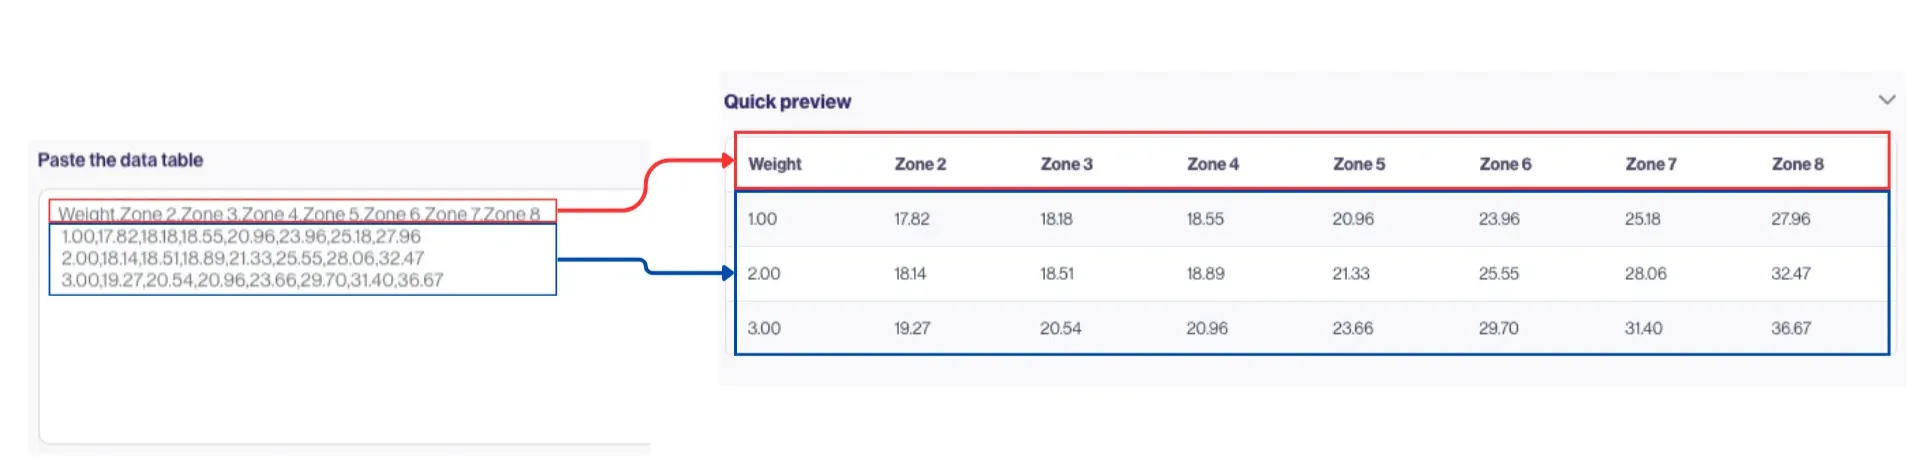
Relationship between pasted data (txt file) and the created table
⚠️
Edge Cases
If you paste more values for the data rows than the header, like in the example below:
Zone 4,Zone 5
1,2,4
2,3,5
the system will treat the first column (”Zone 4”) as the weight column, and the remaining columns as zone columns. Consequently, the output table will display an empty string as the header for the third column.

✍🏻
Editing the Rates Resource
After creating the preview, you have two options:
- Continue adding more columns
- Add a New Column: If the pasted zone doesn't already exist, a new column will be created.
- Update an Existing Column: If the zone already exists, the existing column will be updated with the pasted data.
- Edit or delete existing columns
- To delete an existing column, simply hover over the column and click the x icon.
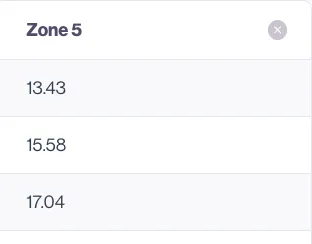
- To edit a column, simply click on it. The column will be highlighted and its data will populate the textbox, allowing you to update both the header and the data rows. Once you have finished editing, click ”Add to Table” to apply the changes.
- If you change the header to one that already exists, the current column will be merged with the existing column, and its data will be updated accordingly. Additionally, the weight column will always default to the weight header regardless of any changes you make. Avoid updating the weight header with a number or with text that includes "zone.”
💡Tip: To exit editing mode, simply click the column again
Once you’re done making changes, click the confirm button to view the created table. You can toggle the table view by clicking the arrow to the left of the carrier shipper name. This will display the table preview along with the edit and delete icons.
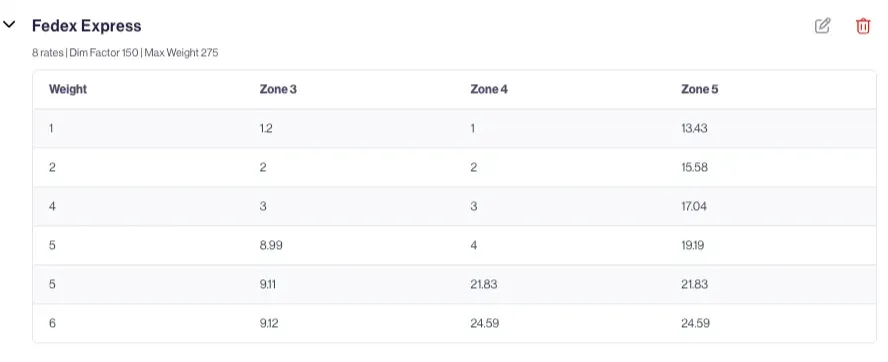
Clicking the edit icon brings up the same screen as the initial create view, allowing you to modify your table. Additionally, you can expand the preview table by clicking the arrow to the right of “Quick preview” to further edit or delete the columns.
If you want to add additional tables, you can click the “Create new table” button. Note that you cannot use both an existing carrier and shipper name together. You can use an existing carrier name with a different shipper name, but if you use an existing shipper name with a different carrier name, the system will update the existing shipper data with the new information.
⚡
Using Rates in a Request
With the Rates resource, users can reference specific services and zones with a shorthand in their request. This requires two critical pieces to be included in the request:
- The Resources array, including the reference to the Rates resource
- A boxTypeDefaults object including a service & zone that exists in the resource.
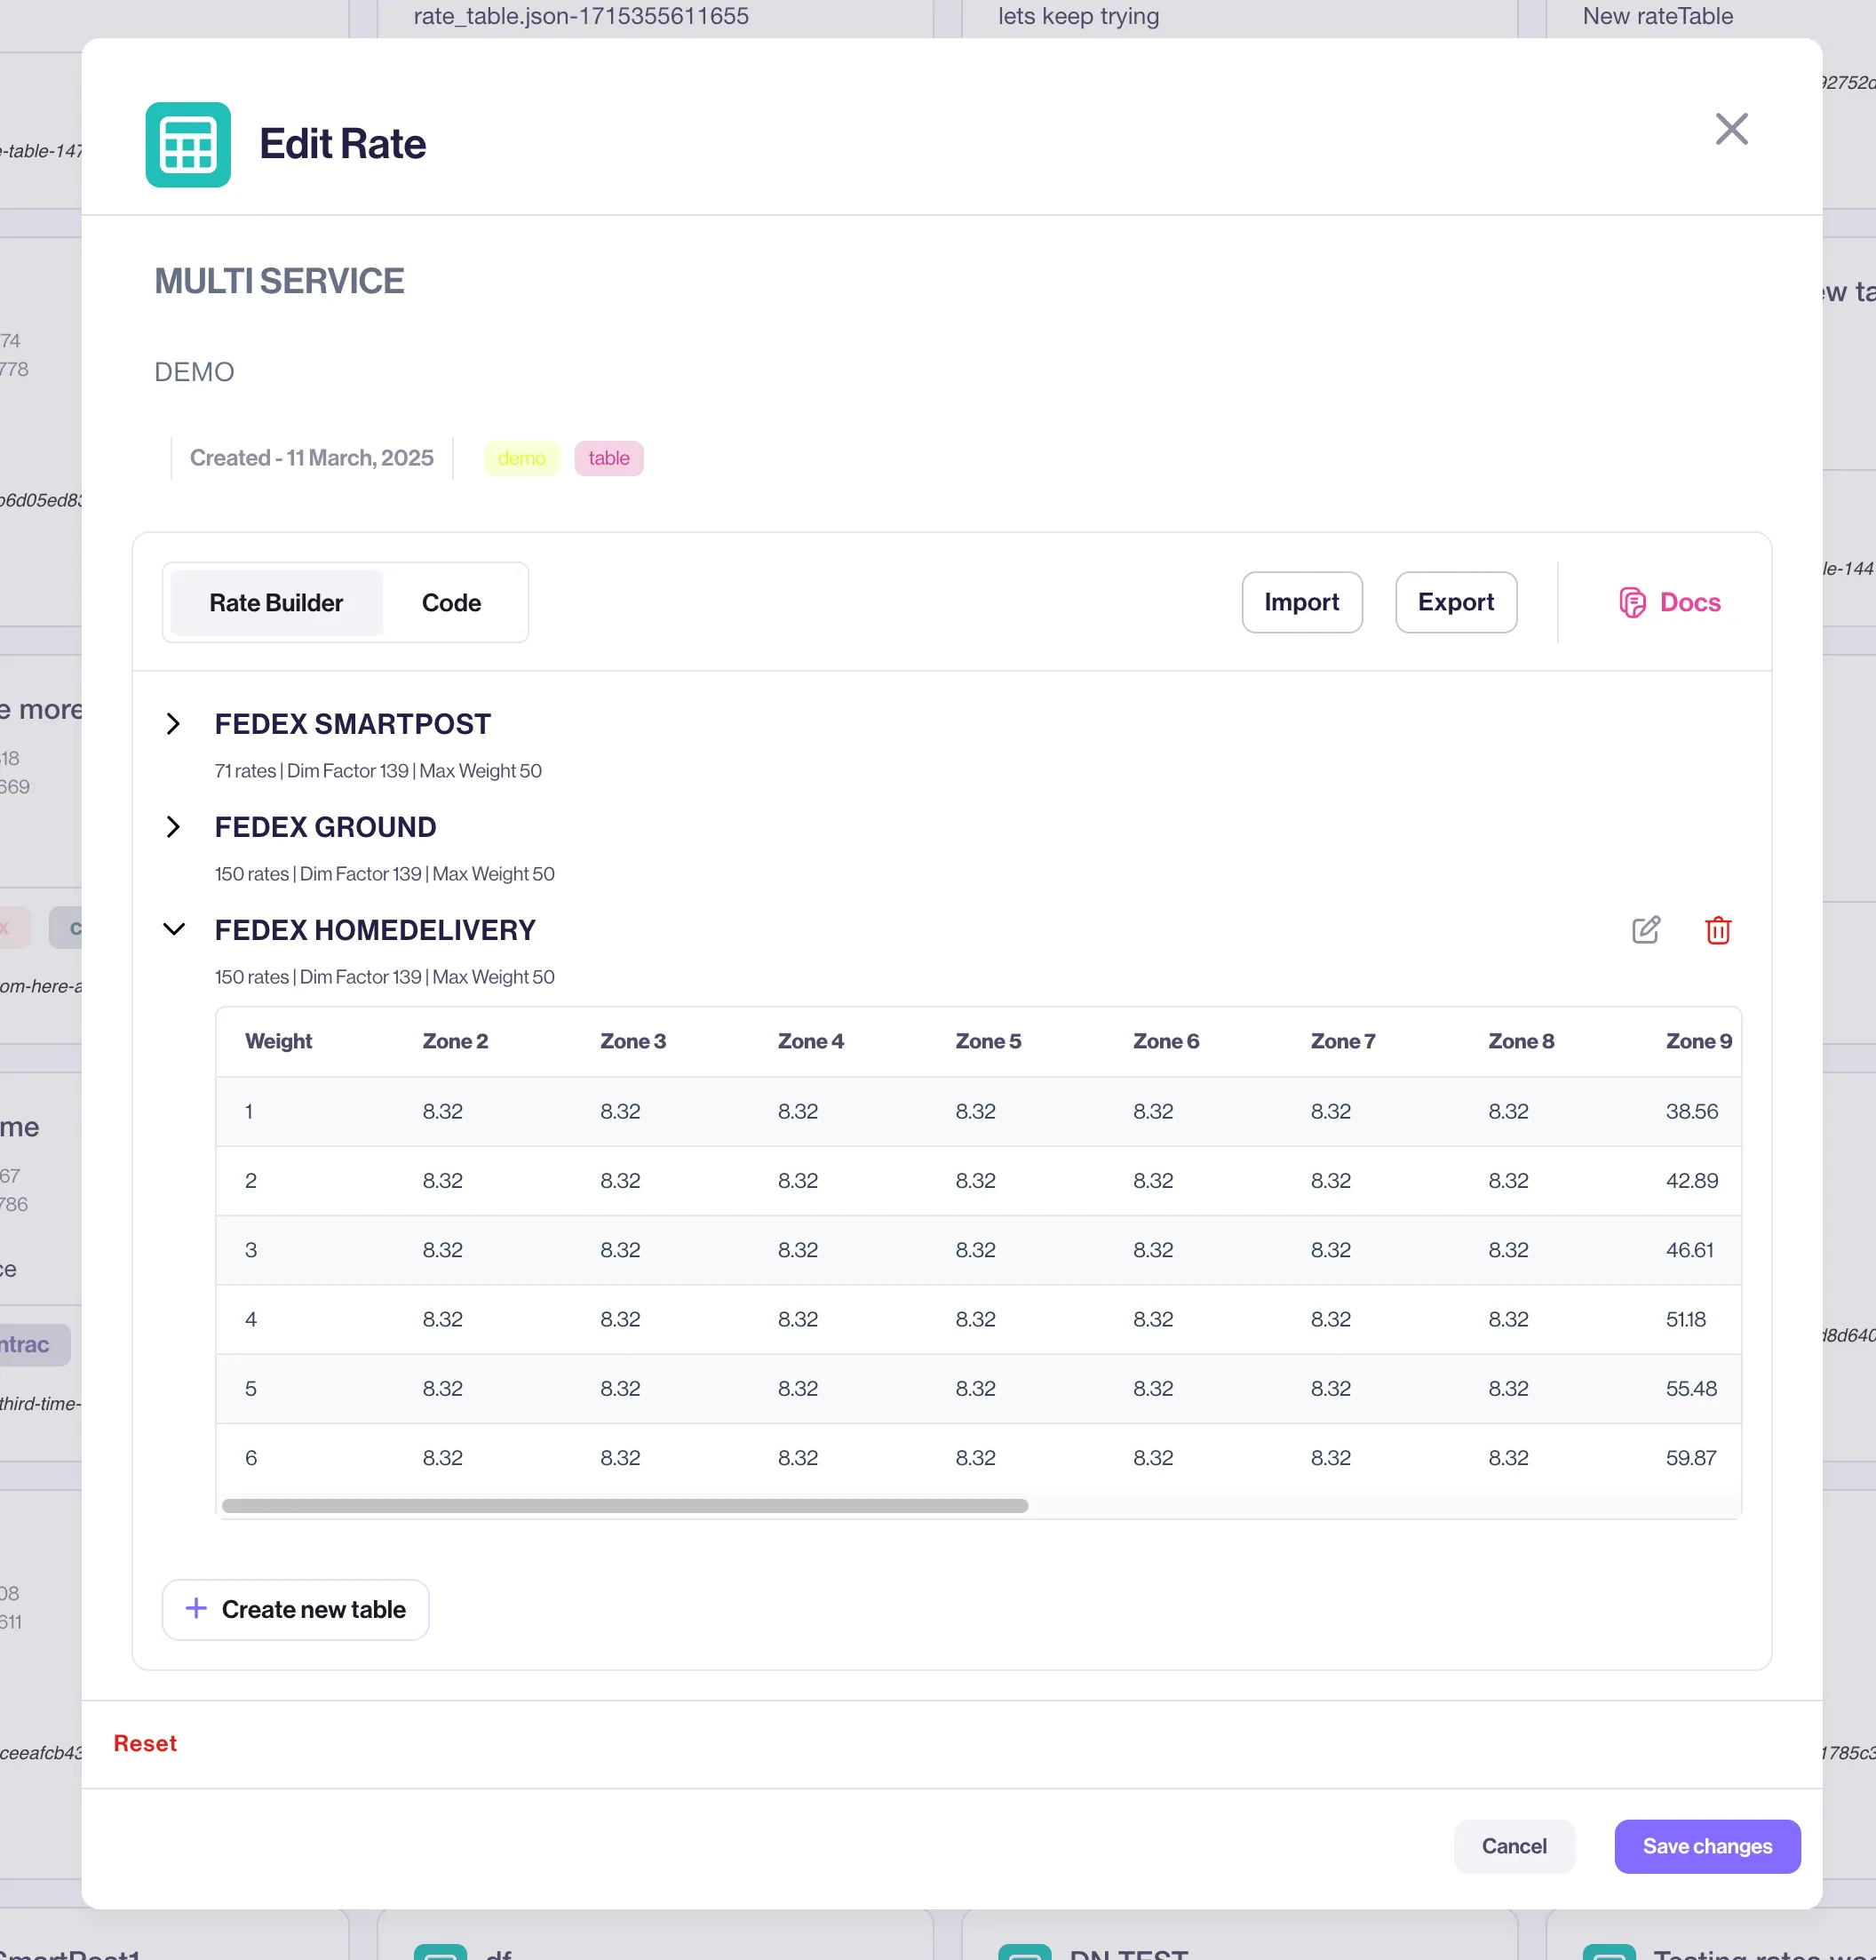
The Rates resource in the screenshot above includes 3 services for the defined carrier (FedEx): SMARTPOST, GROUND, and HOMEDELIVERY.
Here’s an example payload using the HOMEDELIVERY service and including the rates resource — it’s slug is demo-table-multi-service-871:
{
    "itemSets": [
        {
            "refId": 0,
            "weight": 1,
            "dimensions": {
                "x": 3,
                "y": 14,
                "z": 18
            },
            "quantity": 3,
            "name": "nylon",
            "sequence": "SHIRT"
        }
    ],
    "boxTypeDefaults":{
        "rateTable":{"service":"HOMEDELIVERY", "zone":"2"}
    },
    "packResources":[
	    "cartons-master-list-cartons-168",
	    "demo-table-multi-service-871"
	   ]
}
In our API response, we can see that the returned rate table is in fact our HOMEDELIVERY service and it includes the appropriate rates. Here is the API result for this request — it cost $8.32 to pack this box.
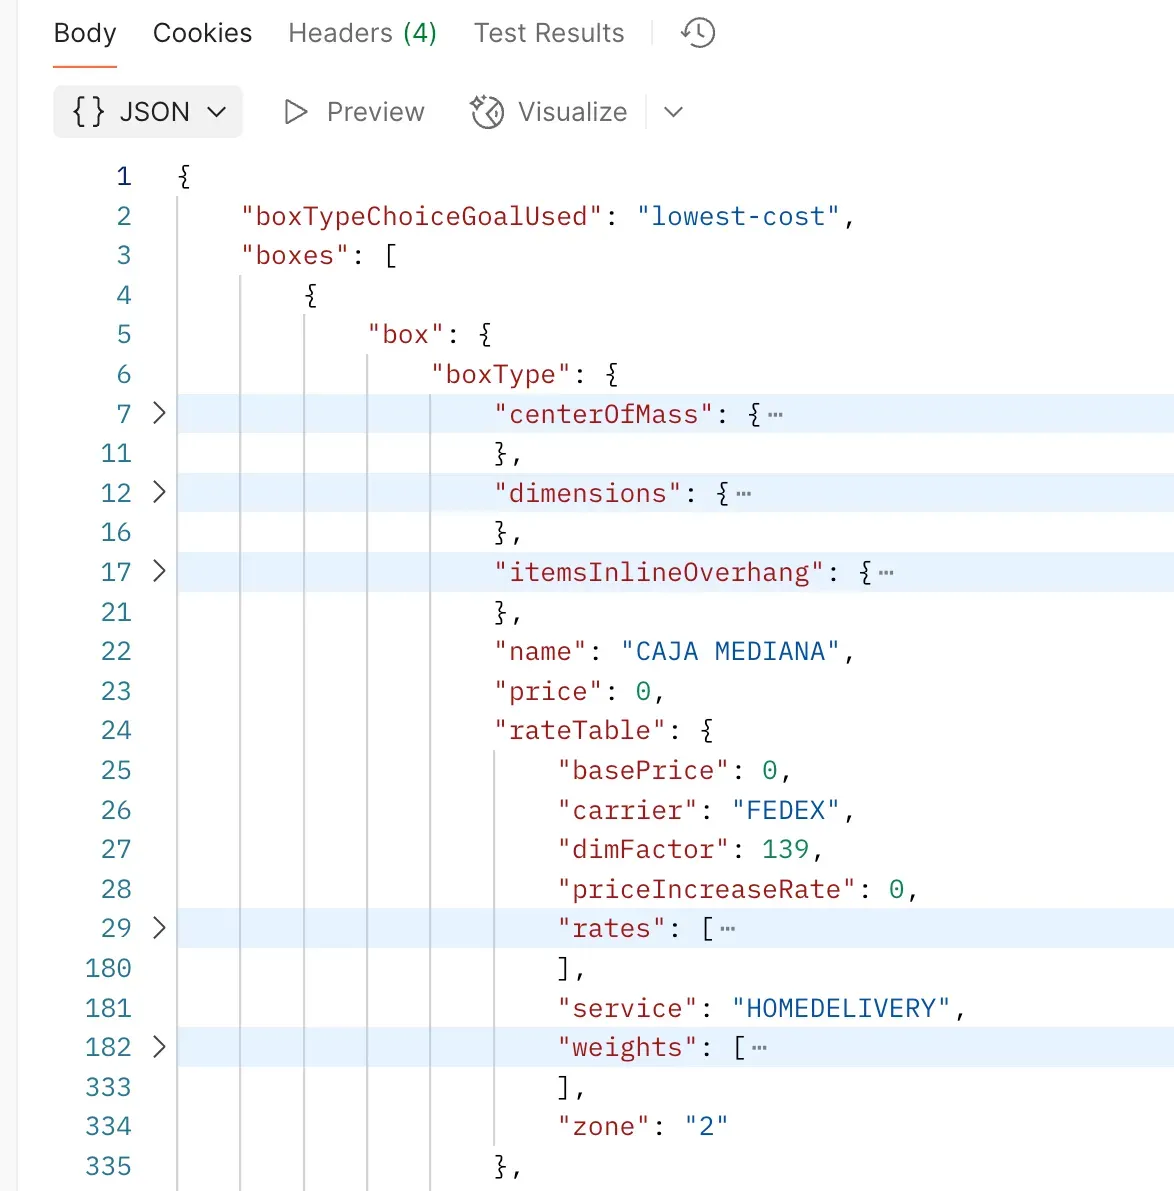
If we change the service in the API payload to “SMARTPOST”, the same packing configuration costs $11.53
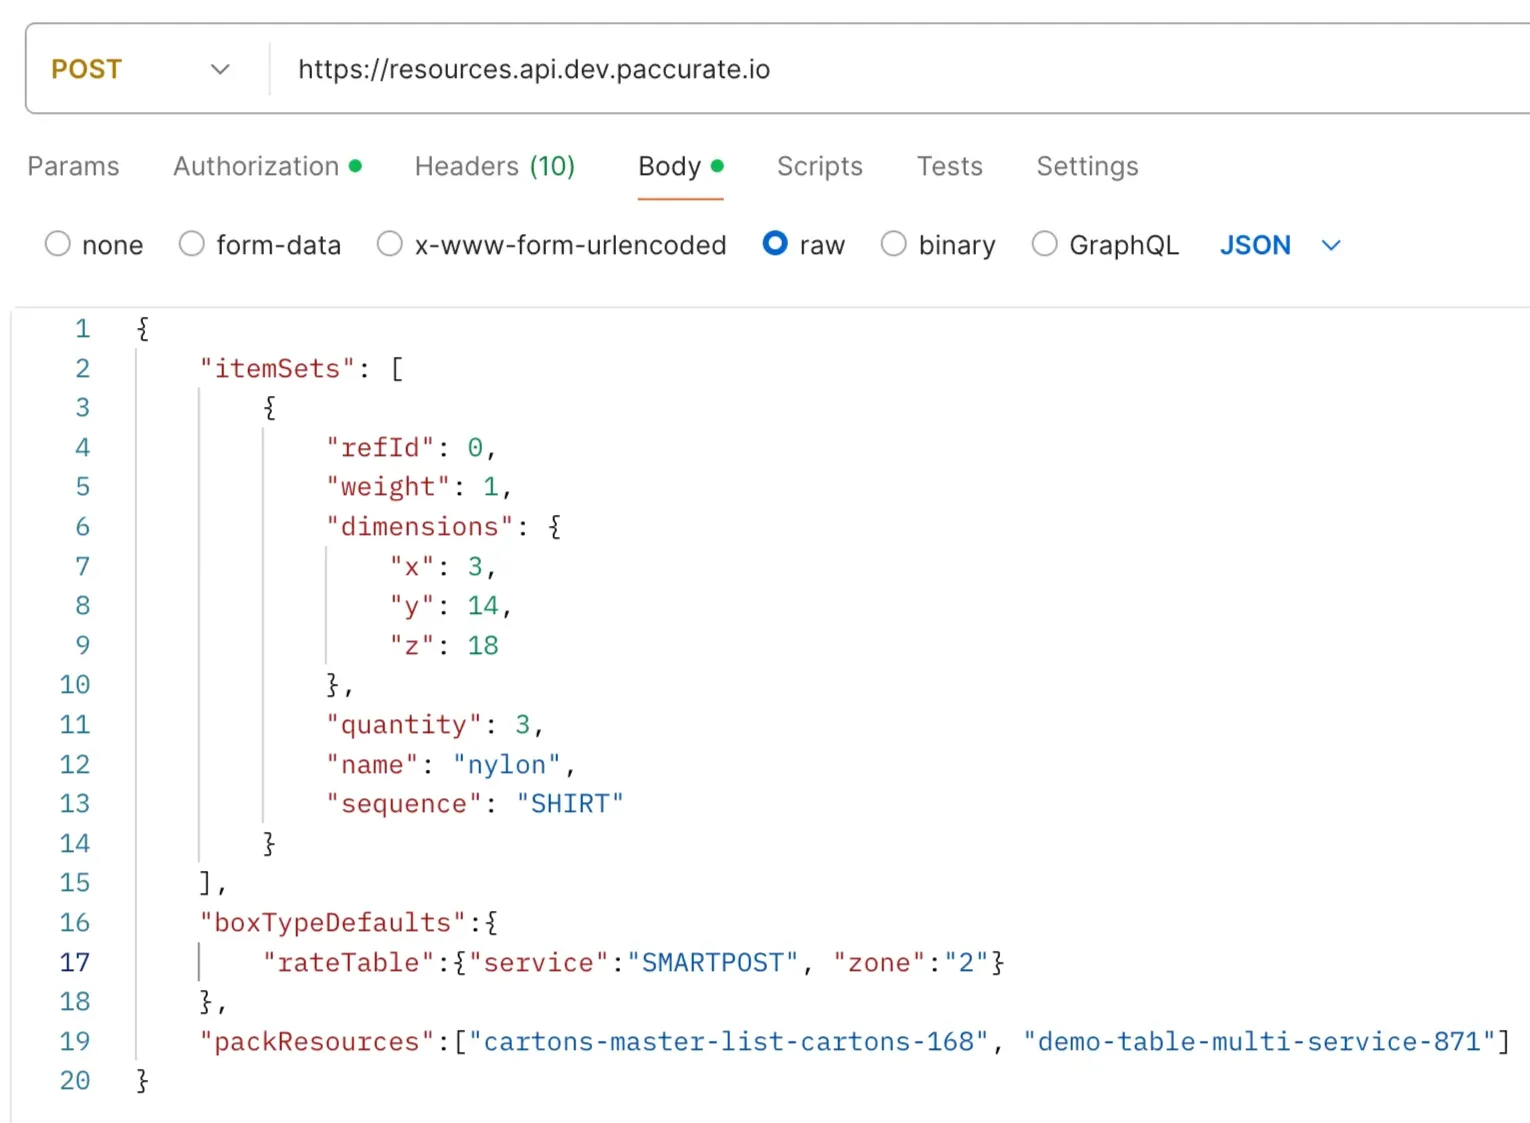
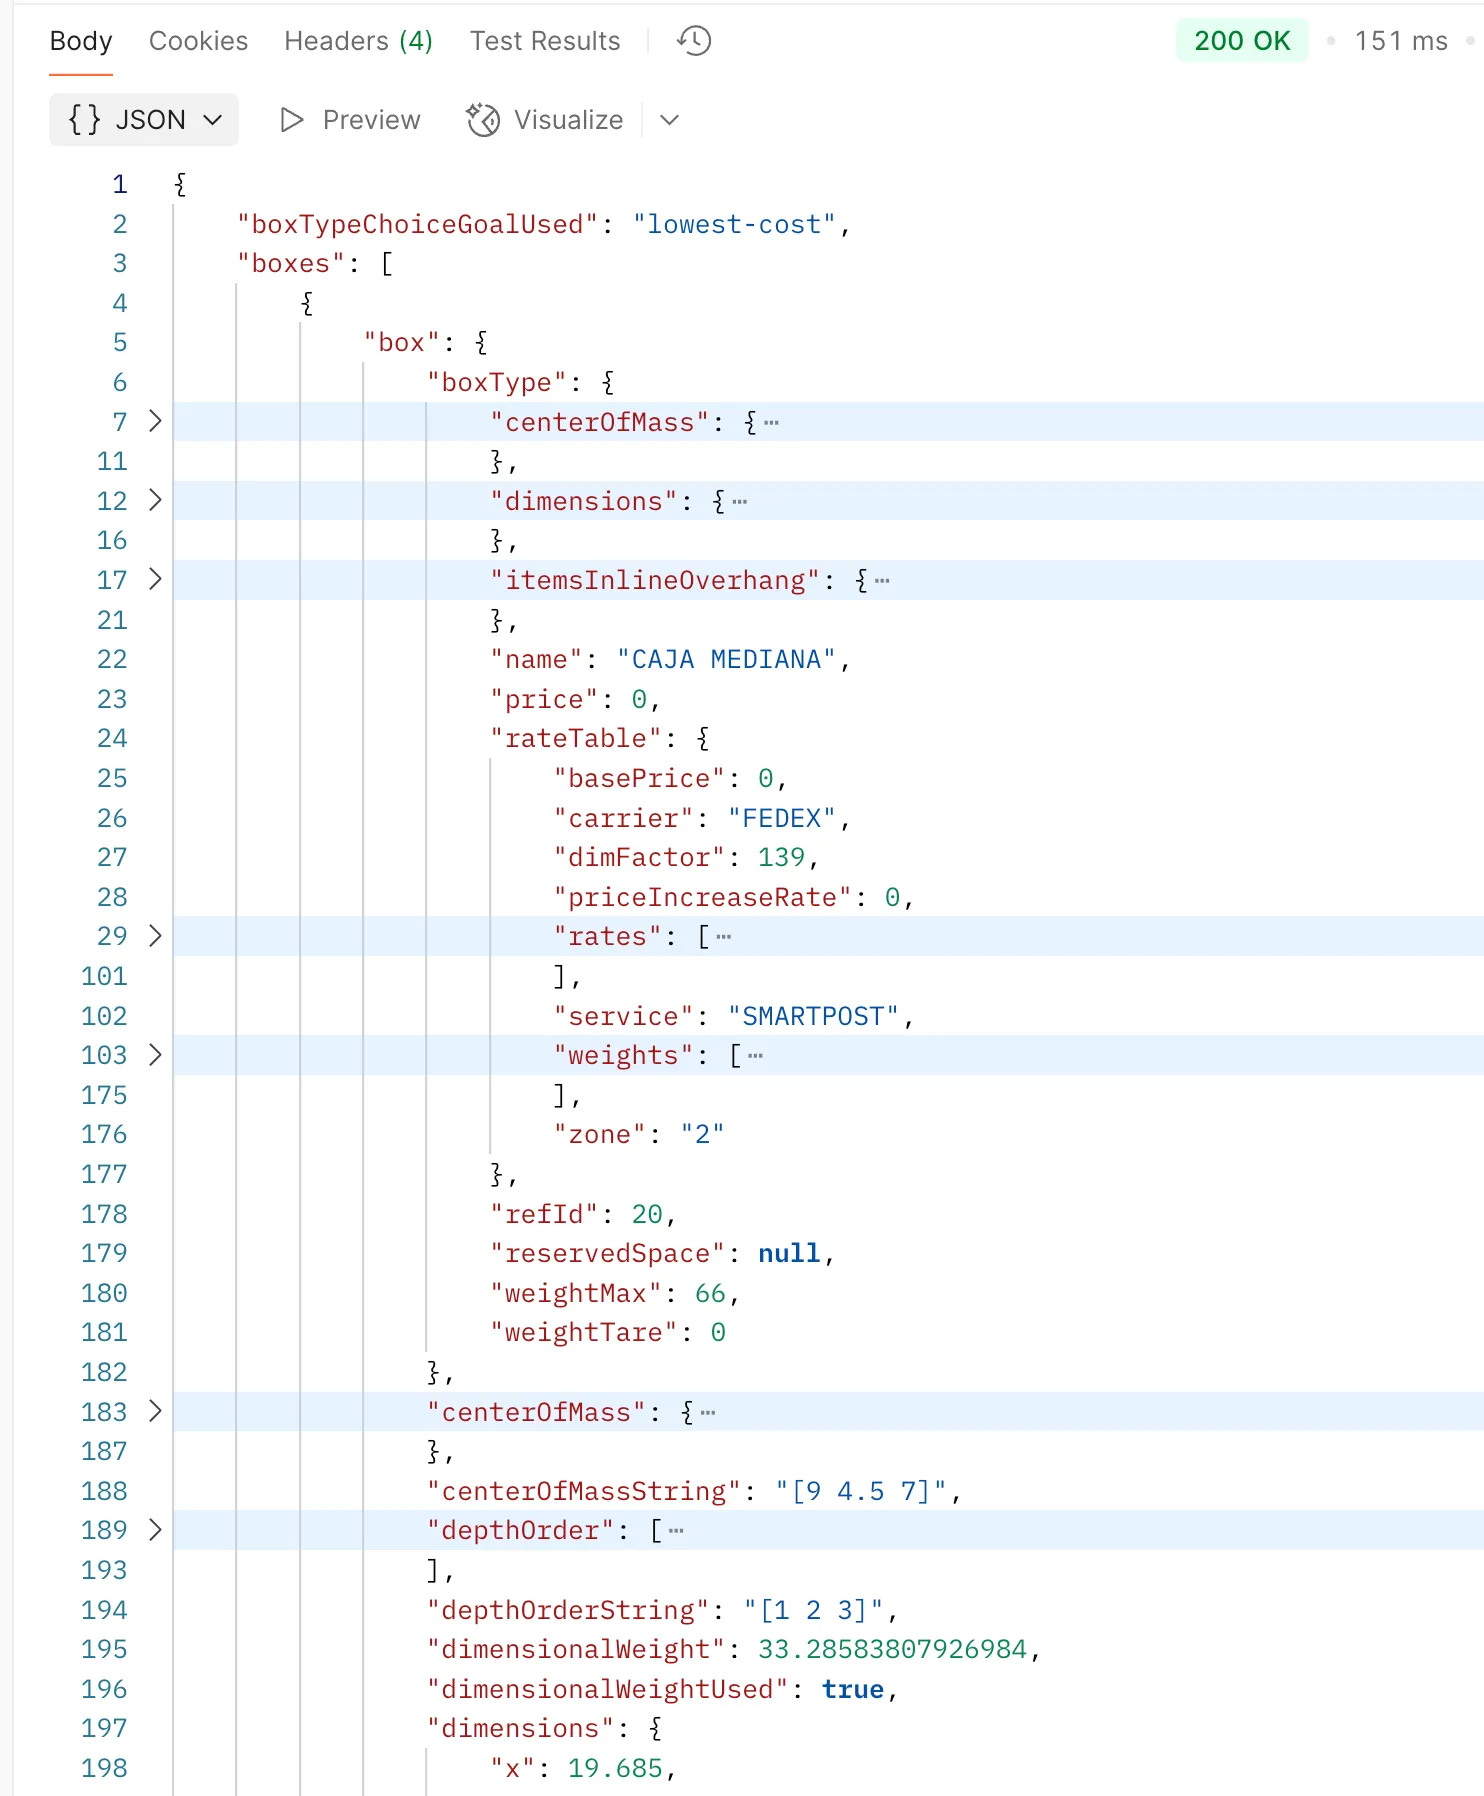
Rates resources are agnostic to carrier names — you can include as many carrier/service combinations as needed one Rates resource and then address different services/zones on a per-request basis.
Rates are a powerful albeit complex Resource type. It’s best to start simple and expand, testing as your comfort level expands.
⚙️ Options (ADVANCED)
What is an Options resource?
The Options Resource type is for users who have actively run PacSimulate jobs, or have worked alongside the Paccurate team to build sophisticated API configurations. An options file is expressed in JSON and can contain any part of the API spec — rules, settings, a cartons, list, box type generators and more.
💡
When to use an Options Resource
Handling advanced mailer or on-demand packaging, or if you are only able to send a single resource reference due to IT constraints and need to combine things like a rate table, rules/settings, and a box type generator.
➕
Creating an Options Resource
To create a rate table resource, log into manage.paccurate.io and navigate to your plan’s Resources page. From the Add dropdown, select “Options”
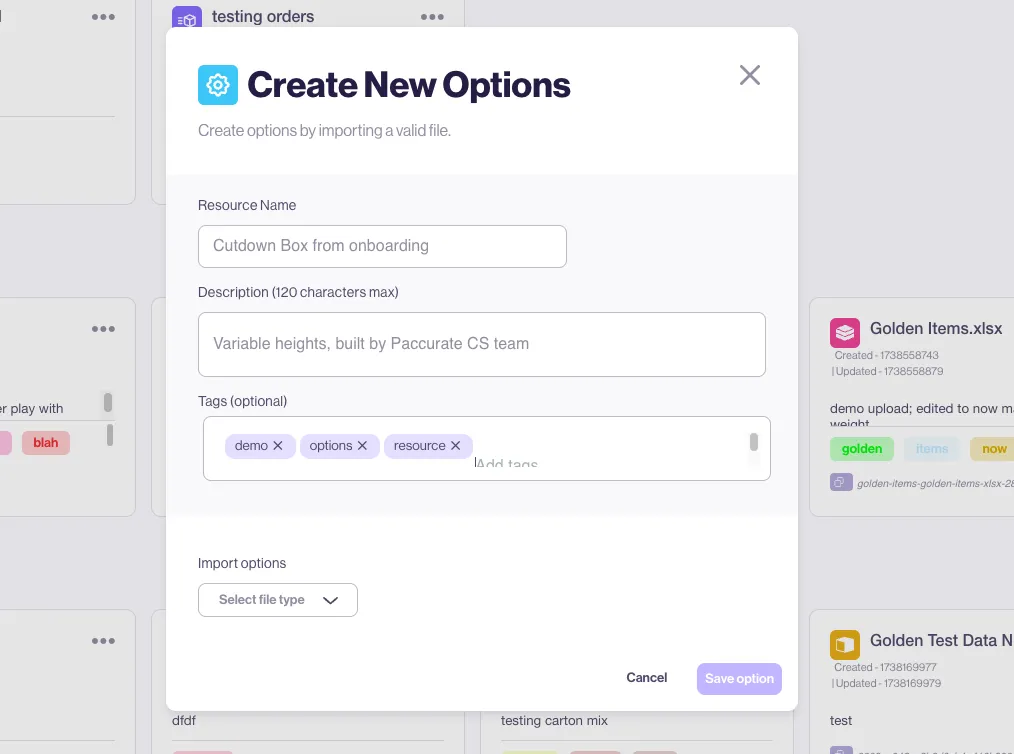
Fill out the Resource’s metadata — name, description, and tags.
Next, select the filetype. Typically this will be JSON, but we do support XLS (data should be in cell A1 of tab named options as well as YAML.
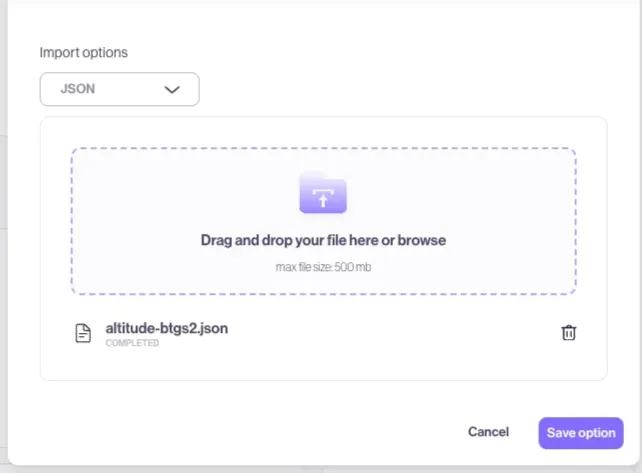
Drop the file into the file upload area, or click the the file icon to trigger a file select window. With the file added to the modal, click “save option”